If you’re tired of rummaging through your shed or garage to find your gardening tools, it’s time to consider a garden tool wall organizer. Not only does it help you keep your tools in one place, but it also maximizes your space and adds a touch of style to your gardening area. With a little creativity and some simple materials, you can create a functional and attractive storage solution that makes your gardening tasks easier and more enjoyable.
Key Takeaways
- Choose durable materials that suit your style and needs.
- Utilize vertical space with pegboards and hooks for easy access.
- Consider DIY options like repurposing old furniture for a custom look.
- Use bins and labels to keep small tools organized and easy to find.
- Regularly maintain and reorganize your setup to keep it functional.
Create Your Dream Garden Tool Wall Organizer
Ready to ditch the garden tool chaos? Let’s get started on creating a wall organizer that’s both functional and stylish. It’s easier than you think, and the payoff – a tidy and efficient gardening space – is totally worth it. No more tripping over rakes or hunting for your favorite trowel!
Choosing the Right Materials
Okay, first things first: materials. Think about where your organizer will live. Is it going in a shed, garage, or out in the open? For outdoor spots, you’ll want weather-resistant stuff like treated wood or even some durable plastic options. For indoor spaces, you’ve got more freedom – regular wood, metal, even reclaimed materials can work great. Consider the weight of your tools too! You don’t want your masterpiece collapsing under the pressure of a few shovels.
Designing for Your Space
Now for the fun part: design! Before you start hammering, take a good look at your space. Measure the wall you’re working with and sketch out a rough plan. Think about the tools you use most often and make sure they’re easily accessible. Taller tools like rakes and shovels will need more vertical space, while smaller items can be grouped together in baskets or on shelves. Don’t forget to leave some room to grow – you know you’ll be adding more tools to your collection eventually!
Incorporating Style and Functionality
Let’s face it, garden tool organizers don’t have to be ugly. Add a splash of color with paint or stain. Use interesting hardware like vintage hooks or decorative brackets. You could even incorporate some greenery by adding small potted plants to your organizer. The goal is to create something that not only keeps your tools organized but also adds a touch of personality to your gardening space. It’s all about making it your dream organizer!
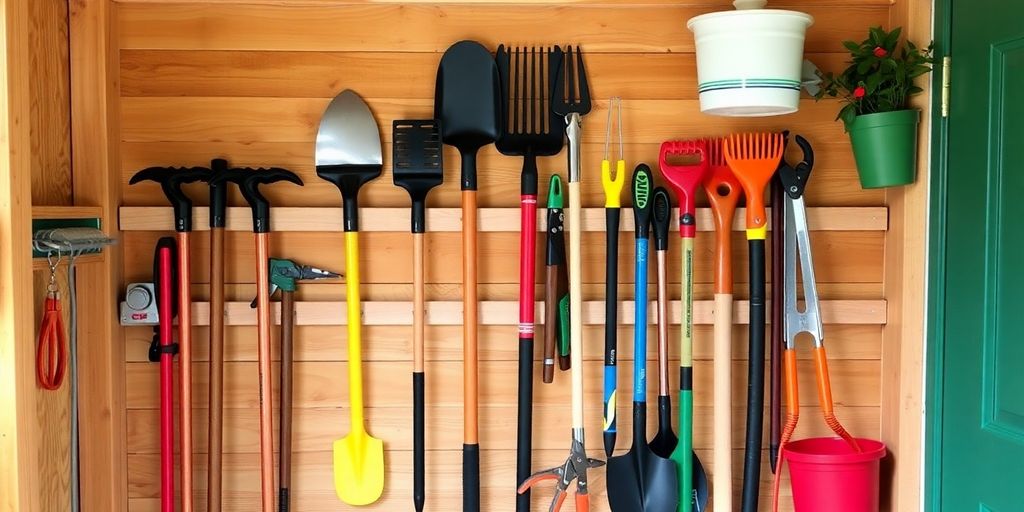
Maximize Vertical Space with Wall Organizers
Okay, so you’re ready to ditch the clutter and really use that wall space, huh? Smart move! Vertical space is like the hidden gem of organization. Let’s explore some ways to make the most of it for your garden tools. It’s easier than you think, and the results are seriously satisfying. Think about it: no more tripping over rakes or searching for that elusive trowel. Just organized bliss.
Utilizing Pegboards for Easy Access
Pegboards are seriously awesome. They’re like the ultimate customizable organization station. You can arrange and rearrange hooks, baskets, and shelves to fit your exact needs. I love how easy it is to see everything at a glance. Plus, they’re super affordable and easy to install. You can find pegboards at pretty much any hardware store. I’ve even seen some cool tutorials online where people paint them or add decorative elements to make them look extra stylish. It’s a great way to add some personality to your garden tool organizer.
Hanging Hooks for Long Tools
Hanging hooks are a total game-changer for those long-handled tools like shovels, rakes, and hoes. No more leaning them precariously against the wall, hoping they don’t fall over! You can get heavy-duty hooks that can handle the weight, and they come in all sorts of styles. I’ve seen some really cool vintage-looking hooks that add a touch of charm. Plus, it’s so easy to just grab a tool and go when it’s hanging right there. It’s all about making gardening easier, right?
Creative Shelving Solutions
Shelving isn’t just for books and knick-knacks, you know. Get creative with shelves in your garden area! Think about adding narrow shelves for smaller items like seed packets, gloves, or even small pots. You could also install a deeper shelf to hold larger items like bags of soil or watering cans. Floating shelves are a great option if you want a clean, modern look. And don’t forget about corner shelves – they’re perfect for maximizing space in those awkward corners. I’m telling you, with a little imagination, shelving can totally transform your storage solutions.
DIY Ideas for a Custom Tool Wall
Repurposing Old Furniture
Okay, so you’re thinking about a tool wall, but you don’t want to spend a ton of money? I get it! That’s where repurposing comes in. Think about that old dresser in the garage, or maybe that bookshelf you were about to toss. These can be amazing starting points for your tool wall.
- Remove drawers and use the frame as a base.
- Attach pegboard to the back for versatile storage.
- Use the old drawers as individual storage bins.
Seriously, with a little creativity, you can transform something old into something super useful and stylish. Plus, you’re keeping stuff out of the landfill – win-win!
Building from Scratch
Alright, if you’re feeling ambitious, building a tool wall from scratch is the way to go. It gives you total control over the size, shape, and layout. Don’t worry, it’s not as hard as it sounds! You can start with a simple frame made from lumber and then customize it to your heart’s content. Consider using a sturdy wooden tool holder for your shovels.
Here’s a basic plan:
- Measure your space and sketch out a design.
- Cut the lumber to size and assemble the frame.
- Attach backing material (plywood or pegboard).
- Add shelves, hooks, and other storage elements.
Building from scratch lets you tailor the organizer to your exact needs. Think about the tools you use most often and design the wall around them. It’s all about making your gardening life easier!
Personalizing Your Organizer
This is where the fun really begins! Once you have the basic structure in place, it’s time to personalize your tool wall. Paint it a fun color, add stencils, or even decoupage it with old seed packets. The possibilities are endless! You can even add some cool lighting to make it pop. Think about adding some hanging hooks for easy access.
Some ideas to get you started:
- Use chalkboard paint to label sections.
- Add magnetic strips for small metal tools.
- Incorporate decorative elements like plants or artwork.
Organizing Small Tools and Accessories
Okay, so you’ve got your big tools sorted on the wall, looking all neat and tidy. But what about those little bits and bobs? The hand trowels, the seed packets, the twine that always seems to disappear? Don’t worry, we’ve got you covered. Let’s dive into how to wrangle those smaller items and keep them just as organized as their larger counterparts. It’s all about making your gardening life easier, right?
Using Baskets and Bins
Baskets and bins are your best friends when it comes to organizing small tools. Seriously, they’re like magic. You can toss everything in, but still find what you need without emptying the whole thing. I like using a mix of sizes – smaller ones for things like plant labels and twist ties, and bigger ones for gloves or hand tools. Wicker baskets add a nice touch, but plastic bins are super practical because you can wipe them down easily. Plus, you can see what’s inside if you opt for clear ones. Think about mounting some small baskets directly onto your tool wall for easy access to frequently used items.
Labeling for Quick Identification
Labeling is a game-changer. Trust me on this one. It doesn’t matter how organized you think you are; without labels, you’ll end up rummaging through everything anyway. A simple label maker is a great investment, or you can just use masking tape and a permanent marker. I like to label not just the contents of the bins, but also where things should go when I’m putting them away. This helps keep everyone in the family on the same page, and it’s especially useful if you have kids helping out in the garden. Here’s a few things you can label:
- Seed Packets (by season or plant type)
- Fertilizers and Plant Food
- Gloves (his, hers, kids)
- Small Hand Tools
Creating a Tool Inventory
Okay, this might sound a little extra, but hear me out. Creating a tool inventory can save you so much time and money in the long run. How many times have you bought something, only to find out you already had one buried in a drawer somewhere? Exactly! A simple list, either on paper or in a spreadsheet, can help you keep track of what you have. You can even add notes about where each item is stored. It’s also a great way to identify what you’re missing and what you need to replace. Plus, it’s super satisfying to check things off as you put them away.
Think of your tool inventory as a map to your gardening success. It’s not just about knowing what you have; it’s about knowing where everything is, so you can grab it and get to work without wasting precious time. It’s about making your gardening experience more enjoyable and less frustrating. And who doesn’t want that?
Maintaining Your Garden Tool Wall Organizer
Okay, so you’ve got your awesome garden tool wall organizer all set up. Now what? Well, like anything else worthwhile, it needs a little love and attention to keep it in tip-top shape. Don’t worry, it’s not a huge deal, and a little effort now will save you headaches later. Let’s dive into how to keep your organizer looking good and working great.
Regular Cleaning and Maintenance
Keeping your tools and organizer clean is super important. Think of it this way: dirt and grime can lead to rust and damage, which means you’ll be replacing tools sooner than you’d like. Plus, a clean organizer just looks better, right?
Here’s a simple routine:
- After each use, wipe down your tools with a damp cloth to remove any dirt or plant debris. A quick wipe is usually enough!
- Every few weeks, give your entire organizer a once-over. Dust it off, wipe down the surfaces, and make sure nothing is loose or wobbly.
- For metal parts, consider using a rust inhibitor spray every few months. It’s a small investment that can really extend the life of your tools.
Seasonal Reorganization Tips
Gardening changes with the seasons, and so should your tool organizer! What you need in the spring is different from what you need in the fall. A little seasonal reorganization can make a big difference.
- In the spring, bring your most-used tools to the front and center. Think trowels, hand rakes, and pruners.
- As summer winds down, swap out those tools for your fall gardening essentials, like leaf rakes and bulb planters.
- Before winter hits, take everything off the organizer and give it a thorough cleaning. This is a great time to inspect your tools for any damage and make repairs.
Consider storing tools you won’t use during the winter months in a separate location, like a shed or garage. This will free up space on your organizer and keep your tools protected from the elements.
Upgrading Your Setup
Your needs might change over time, and that’s okay! Don’t be afraid to tweak your garden tool wall organizer to better suit your gardening style. Maybe you’ve acquired some new tools, or perhaps you’ve realized that a certain layout just isn’t working for you.
Here are a few ideas for essential steps to upgrade:
- Add more hooks or shelves if you’re running out of space. There are tons of affordable options available online or at your local hardware store.
- Repurpose old containers or baskets to hold small items like seeds, gloves, or plant markers.
- Consider adding a small workbench or potting station near your organizer. This can create a convenient and efficient gardening hub.
Incorporating Garden Tool Wall Organizers in Sheds
Let’s talk sheds! We often think of sheds as just a place to dump everything, but they can be so much more. A well-organized shed can seriously boost your gardening game. And guess what? Garden tool wall organizers are a total game-changer for shed organization. They help you maximize space and keep everything in its place. It’s all about making your shed a functional and enjoyable space to be in. No more tripping over rakes or searching for that elusive trowel!
Designing a Functional Shed Layout
Okay, so first things first: think about how you actually use your shed. Do you just store tools, or do you also pot plants, start seeds, or maybe even do some light repairs? Your shed’s layout should reflect its purpose. Consider the flow of traffic and where you’ll need the most space. For example, if you do a lot of potting, dedicate an area near the door for easy access to soil and pots. Don’t forget to account for natural light – positioning your workbench near a window can make a huge difference.
Maximizing Shed Storage
Now, let’s get down to the nitty-gritty of storage. Wall organizers are your best friend here. Think vertically! Pegboards, hanging hooks, and shelves can hold a surprising amount of stuff.
Here are some ideas:
- Use clear bins to store smaller items like seeds, gloves, and plant markers.
- Install a wall-mounted rack for long-handled tools like shovels and rakes.
- Hang a magnetic strip to keep small metal tools like pruners and trowels within easy reach.
Remember to regularly declutter your shed. Get rid of anything you don’t use or need. This will free up valuable space and make it easier to find what you’re looking for.
Creating a Potting Station
If you’re serious about gardening, a potting station in your shed is a must. It doesn’t have to be fancy – a simple workbench with a few shelves will do. Make sure you have a good supply of potting soil, pots, and tools. A small sink or water source nearby can also be super handy. Consider adding a wheeled garden tool caddy to keep your tools organized and portable. With a little planning, your shed can become a gardener’s paradise!
Benefits of a Garden Tool Wall Organizer
Saving Time and Reducing Clutter
Okay, let’s be real – how much time do we actually spend hunting for that one specific trowel? It’s probably way more than we’d like to admit. A garden tool wall organizer is a total game-changer for saving time. No more rummaging through piles of tools! Plus, it seriously cuts down on clutter. Everything has its place, and you’ll actually be able to see what you own. It’s like a breath of fresh air for your shed or garage.
Protecting Your Tools
Think about it: when your tools are just tossed in a heap, they’re banging against each other, getting scratched, and generally not living their best lives. A wall organizer keeps them separated and safe from damage. Plus, hanging them up allows for better air circulation, which helps prevent rust and corrosion. Basically, you’re extending the life of your precious tools, which saves you money in the long run. It’s a win-win!
Enhancing Your Gardening Experience
Honestly, a well-organized garden tool setup just makes gardening more enjoyable. When you can easily find what you need, you’re less stressed and more focused on the fun stuff – like actually gardening! It’s all about creating a space that’s both functional and inspiring. And who knows, maybe a tidy tool wall will even motivate you to spend more time in the garden. I know it would for me!
Having a dedicated spot for each tool means less frustration and more time spent doing what you love. It’s about creating a system that works for you, making your gardening tasks smoother and more efficient. Plus, it just looks nice, right?
Wrap-Up: Your Garden, Your Way
So there you have it! A stylish garden tool wall organizer can really change the game for your gardening space. Not only does it keep everything neat and tidy, but it also makes it super easy to grab what you need when you need it. Plus, you get to show off your creativity with how you set it up. Whether you go for a rustic vibe or something sleek and modern, the options are endless. So, roll up your sleeves, get organized, and enjoy your gardening adventures without the clutter. Happy gardening!
Frequently Asked Questions
What materials do I need to make a garden tool organizer?
You can use wood, pegboards, metal hooks, and baskets. Choose materials that fit your style and space.
How do I design my garden tool wall organizer?
Think about your space first. Measure the wall and decide how many tools you need to store. Sketch a simple plan.
Can I use old furniture for my organizer?
Yes! Old furniture can be repurposed into shelves or hooks. Just make sure it’s sturdy enough to hold your tools.
How can I keep my small tools organized?
Use baskets or bins to group small tools together. Label them so you can find what you need quickly.
How do I maintain my garden tool wall organizer?
Regularly clean your tools and the organizer. Check for any damage and reorganize as needed, especially with the changing seasons.
What are the benefits of having a garden tool wall organizer?
It saves time by keeping tools easy to find, reduces clutter, and helps protect your tools from damage.