If you’re looking to spruce up your backyard, why not consider some creative outdoor wood stacking ideas? Using logs in unique ways can not only enhance the look of your space but also add functionality. From planters to seating, the possibilities are endless. Let’s dive into ten innovative ways to use logs that will make your outdoor area more inviting and stylish.
Key Takeaways
- Logs can be transformed into beautiful planters for flowers and herbs.
- Stacked logs can serve as unique displays or borders in your garden.
- Creating log furniture adds rustic charm and practical seating options.
- Using logs for pathways can enhance the natural look of your yard.
- Log fire pits are perfect for cozy gatherings and outdoor entertainment.
1. Log Planters
Okay, so you’ve got some logs lying around, right? Instead of just stacking them (which, hey, is cool too – more on that later!), why not turn them into awesome planters? It’s way easier than you think, and it adds such a cool, rustic vibe to your backyard. Plus, it’s a great way to use up those logs from that tree you had to take down last fall.
Log planters are a fantastic way to bring a touch of nature right into your outdoor living space.
First things first, you’ll need some logs. Kiln-dried logs are great because they last longer, but honestly, any decent-sized log will do. Then, you just hollow them out. I know, it sounds like a lot of work, but it’s actually pretty therapeutic. Grab a chisel and hammer, and start carving out the center. Make sure you leave enough wood around the edges so the planter doesn’t fall apart. Think of it like making a canoe, but for plants.
Once you’ve got your hollowed-out log, it’s time to get planting! Put some gravel at the bottom for drainage, then fill it up with good quality soil. Pick plants that will thrive in the amount of sunlight your planter will get. I’ve seen people do everything from herbs to flowers to even small vegetable plants. The possibilities are endless! And don’t forget to water them regularly.
I tried this last year with some old birch logs, and it was a total game-changer for my patio. The ferns and sedges I planted looked amazing, and it was so easy to keep them watered. Plus, it was a great conversation starter when people came over. Seriously, give it a try – you won’t regret it!
If you’re looking for inspiration, check out some HD stock images of log planters. You’ll find tons of ideas to get you started!
2. Stacked Log Displays
Adding stacked log displays to your garden is more than just practical; it’s a chance to show off the wood’s natural beauty in a creative way! You can arrange the logs in various designs, turning a simple stack into a focal point. Whether you prefer a simple, rustic look or something more elaborate, the wood will stay strong and beautiful throughout the year.
Get inventive with these logs! Mix them into existing garden features or build something entirely new. You could use them to outline flower beds or create a cozy little seating area. The possibilities are endless, making your wood storage both interesting and pretty. For example, you can use rustic split style decorative logs to enhance your media wall.
Stacked log displays have so many uses, making your wood storage interesting and pretty. They’re both useful and a way to show off your personal style.
Here are a few ideas to get you started:
- Simple vertical stacks for a minimalist look
- Criss-cross patterns for added visual interest
- Circular arrangements around trees or garden features
3. Log Furniture
Okay, so you’ve got logs. Now what? Let’s turn them into furniture! It’s way easier than you think, and the results are super cool. Plus, you get to say you made your own furniture. How awesome is that?
Log furniture brings a totally unique, rustic vibe to any backyard. It’s practical, stylish, and a fun project all rolled into one. Seriously, imagine chilling on a bench you built yourself.
Here are a few ideas to get you started:
- Rustic Benches and Tables: These are classics for a reason. They’re sturdy, look great, and are relatively simple to construct. Just make sure you use logs that are dried properly to avoid cracking later on. Nobody wants a wobbly bench!
- Outdoor Bar Stools: If you’ve got an outdoor bar area, log stools are a must. They add a natural, earthy feel that just screams relaxation. Plus, they’re a great conversation starter. "Oh, these stools? Yeah, I made them."
- Log Loungers: For the ultimate in relaxation, try building a log lounger. It might take a bit more effort, but trust me, it’s worth it. Picture yourself lounging in the sun, drink in hand, on your very own log creation. Pure bliss.
I remember trying to build a log bench last summer. I thought it would be a breeze, but turns out, lining everything up perfectly is harder than it looks! After a few hours, some creative problem-solving (and a lot of sweat), I finally had a bench. It wasn’t perfect, but it was mine, and it looked awesome in the yard.
So, grab some logs, get your tools ready, and let’s get building! You’ll be amazed at what you can create.
4. Decorative Log Borders
Okay, so you’re thinking about sprucing up your garden, right? Decorative log borders are a super easy way to do it! They’re not just practical; they can seriously boost the whole look of your backyard. I mean, who doesn’t love a bit of rustic charm?
A decorative log border can make your garden look better and more useful. By using kiln-dried logs, you can make a beautiful edge. It helps define areas in your garden. This easy project adds a touch of nature and fits well in any outdoor space.
Think of it this way:
- They define your garden beds like a boss.
- They add a natural, rustic vibe that’s super trendy.
- They’re surprisingly easy to install – even I could do it (and I’m not exactly a DIY whiz).
Putting in a decorative log border helps mark out garden beds, paths, or areas in your backyard. It’s easy to do and really changes how your garden looks. Your log decor can be both useful and a way to show off your personal style.
And the best part? You can totally customize them! Stack them high, lay them flat, use different sizes… the possibilities are endless. You can explore various garden edging materials to find the perfect fit for your space. Seriously, get creative with it! It’s your garden, after all. Plus, using kiln-dried logs means they’ll last longer and look better, resisting rot and pests. Win-win!
5. Kiln-Dried Log Pathways
Okay, so you’re thinking about pathways, huh? Forget boring concrete! Let’s talk about making some seriously cool walkways using kiln-dried logs. It’s way easier than you think, and the result? A backyard that looks like it came straight out of a magazine. Plus, it’s a great way to repurpose wood piles you might already have lying around.
First things first, why kiln-dried? Well, these logs are dried in a special oven, which means they’re less likely to rot or attract bugs. That’s a win in my book. They’re also lighter and easier to work with. Trust me, your back will thank you.
Now, let’s get into the fun part – building the pathway! Here’s a simple breakdown:
- Prep the Ground: Clear the area where you want your path. Dig down a few inches and level it out. You want a nice, even surface to work with.
- Lay a Base: Add a layer of gravel or sand. This helps with drainage and keeps the logs from sinking into the dirt over time.
- Arrange the Logs: Get creative! You can lay the logs side-by-side for a solid path or space them out and fill in with gravel, mulch, or even small pebbles. It’s all about the look you’re going for.
- Secure the Logs: This is important. You don’t want your pathway shifting every time someone walks on it. Use landscape adhesive or even drive stakes into the ground on either side of the logs to keep them in place.
I remember when I first tried this, I didn’t secure the logs properly. Let’s just say it looked great for about a week, and then it turned into a wobbly mess. Learn from my mistakes!
And that’s pretty much it! You’ve got yourself a unique, eye-catching pathway that’s sure to impress. Plus, it’s a fantastic way to add a touch of rustic charm to your backyard. Who knew wood stacking could be so stylish?
6. Log Fire Pits
Dreaming of cozy evenings? A log fire pit could be just the thing to make your backyard the ultimate hangout spot. There’s something magical about gathering around a fire, sharing stories, and enjoying the outdoors.
Choosing the right spot is key. You’ll want to make sure it’s a safe distance from anything that could catch fire – like trees or your house. Think about where the wind usually blows and where people will be sitting to get the most out of it.
Building your own log fire pit is totally doable. You can use stones or bricks designed for fire pits. Start by marking out the size you want. Then, dig a shallow trench and fill it with gravel. Place your stones or bricks around it to create the walls. Make sure the base is level and that there are gaps for airflow.
For the best fire, go with kiln-dried logs. Types like ash are great because they’re super dry. They burn cleaner, meaning less smoke, and they keep the fire going strong. A warm fire can make any evening feel special. Just remember to store your kiln-dried logs somewhere dry!
A log fire pit isn’t just a source of heat; it’s a focal point that brings people together. It’s a place for laughter, conversation, and making memories that will last long after the embers have faded.
7. Log Art and Sculptures
Okay, so you’ve got logs. Now what? Let’s get artsy! Turning logs into art is way easier than you might think, and it’s a fantastic way to add some personality to your backyard. Plus, it’s a great conversation starter. Forget boring old garden gnomes; let’s make something unique!
Think about it: you can carve them, stack them in cool ways, or even paint them. The possibilities are endless. And the best part? It’s all about having fun and expressing your creativity. Don’t worry about being perfect; the natural imperfections of the wood are what make it special. Let’s dive into some ideas.
Using logs for art is a super fun way to bring nature and creativity together. It’s like giving your backyard a little bit of your soul.
I remember this one time, my neighbor tried to make a log sculpture that was supposed to be a bear. It ended up looking more like a very lumpy dog, but everyone loved it anyway! It just goes to show, it’s the effort and the fun you have that really matters.
Here are a few ideas to get you started:
- Carved Totems: Grab some carving tools and go wild! You can create faces, animals, or abstract designs.
- Stacked Sculptures: Think about creating towers or other interesting shapes by stacking logs of different sizes. It’s like playing with giant LEGOs!
- Painted Logs: If carving isn’t your thing, grab some outdoor paint and transform your logs into colorful masterpieces. You could paint patterns, landscapes, or even portraits.
Don’t be afraid to experiment and see what you come up with. You might surprise yourself! And hey, even if it doesn’t turn out exactly as planned, you’ll still have a cool, unique piece of art for your backyard. Plus, you can always say it’s "abstract."
And if you’re looking for inspiration, check out some decorative logs online. You might find some cool ideas to try out yourself!
8. Log Seating Areas
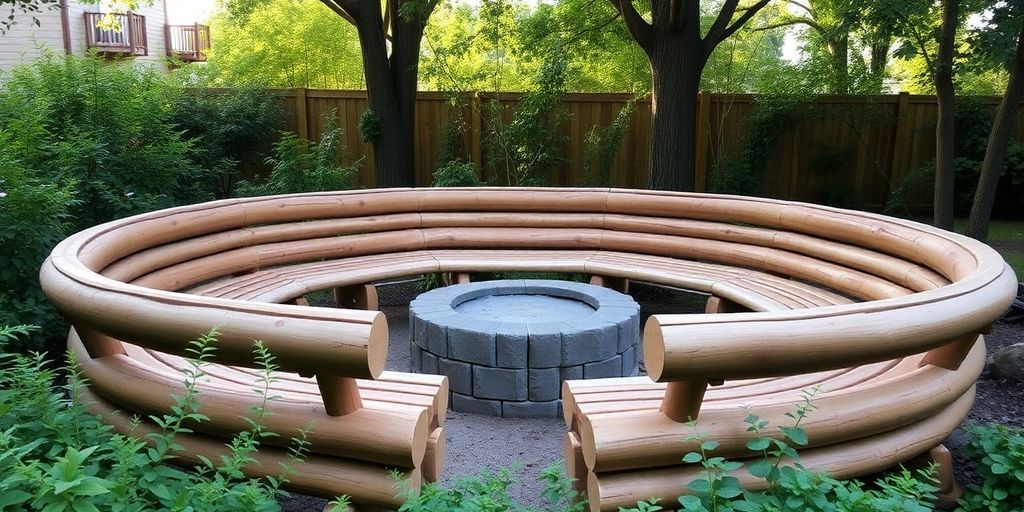
Okay, now we’re talking! Who doesn’t love a cozy spot to relax in their backyard? Log seating areas are where it’s at. They’re rustic, charming, and surprisingly comfortable. Plus, they’re a fantastic way to use up some of those extra logs you’ve got lying around. Let’s get into how you can make this happen.
Think about creating a space that invites conversation and relaxation. It’s all about making your backyard feel like an extension of your home, a place where you actually want to spend time. And what better way to do that than with some creatively arranged logs?
Here are a few ideas to get you started:
- Simple Log Benches: Just find some sturdy logs, maybe flatten one side for a more comfortable seat, and arrange them around a fire pit or in a circle. Boom! Instant seating.
- Stacked Log Chairs: Get a little more ambitious and stack logs to create chair-like structures. You can even add some cushions for extra comfort. Don’t forget to consider the outdoor patio ideas for styling.
- Log Sofas: If you’re feeling really adventurous, try building a log sofa. This might require some more advanced woodworking skills, but the result is a truly unique and impressive piece of outdoor furniture.
Remember to treat the wood to protect it from the elements. A good sealant will keep your log seating area looking great for years to come.
Consider the overall design of your backyard when planning your log seating area. Do you want it to blend in with the natural surroundings, or do you want it to stand out as a focal point? Either way, with a little creativity, you can create a space that’s both beautiful and functional. It’s all about making your backyard a place you love.
9. Log Garden Edging
Okay, so you’re thinking about sprucing up your garden, right? Well, let me tell you, using logs for garden edging is a fantastic idea! It’s like giving your garden a natural, rustic hug. Plus, it’s way easier than you might think. I remember when I first tried it; I was a bit intimidated, but honestly, it was a breeze.
Log garden edging is a simple way to define your garden beds and pathways. It’s also a great way to use up any extra logs you might have lying around. Think of it as recycling, but for your backyard! You can use different sizes and types of wood to create a unique look that fits your style. I’ve seen people use everything from small branches to large logs, and they all look amazing.
Here’s a few things to consider:
- Type of Wood: Some woods last longer than others. Cedar and redwood are naturally rot-resistant, which is a big plus. But honestly, even if you use something like pine, it’ll still look great for a few years. Just be prepared to replace it eventually.
- Size and Shape: This is where you can get creative! Do you want a uniform look with all the same size logs? Or a more natural, varied look? It’s totally up to you. I personally like a mix of sizes, it adds a bit of character.
- Installation: This is the easy part. Just dig a shallow trench where you want your edging to go, and then place the logs in the trench. You can use a rubber mallet to gently tap them into place. If you want extra stability, you can use rebar stakes to hold them in place.
I’ve found that adding a layer of mulch behind the log edging really helps to keep weeds down and makes the garden look even more polished. It’s a small detail, but it makes a big difference. Plus, it helps to retain moisture in the soil, which is always a good thing.
So, what are you waiting for? Grab some logs and get edging! You’ll be amazed at how much it transforms your garden. It’s a simple project that can make a big impact, and it’s a whole lot of fun too!
10. Log Storage Racks
Okay, so you’ve got all these awesome logs, right? Now, where do you put them? Just chucking them in a pile isn’t exactly a design statement. That’s where log storage racks come in! They’re not just practical; they can actually add to the look of your backyard. Let’s explore some ideas.
Simple Freestanding Racks
These are your basic, no-fuss options. Usually made of metal tubing, they keep your logs off the ground, which is super important for preventing rot and bug infestations. Plus, they’re easy to move around if you decide to rearrange your outdoor space. You can find them in all sorts of sizes, so whether you’re storing a weekend’s worth of firewood or enough to last through winter, there’s a rack for you. For example, the Outsunny outdoor wood storage rack is a great option for smaller spaces.
Built-In Log Storage
If you’re feeling a bit more ambitious, consider building your own log storage into an existing structure, like a shed or even a retaining wall. This can look really slick and save space. Think about incorporating a roof to keep the logs dry, and make sure there’s good airflow to prevent mold.
Building your own log storage rack can be a fun weekend project. It allows you to customize the size and design to perfectly fit your needs and backyard aesthetic. Plus, it’s a great way to use up any scrap wood you might have lying around.
Decorative Log Rack Designs
Who says log storage has to be boring? Get creative with the design! Use different sizes of logs to create a visually interesting pattern. You could even incorporate some metal or stone elements for a cool, industrial vibe. Think about painting or staining the wood to match your outdoor furniture. The possibilities are endless!
Here are some ideas to get you started:
- A-Frame Rack: Easy to build and looks great.
- Circular Rack: A unique and eye-catching design.
- Tiered Rack: Maximizes space and adds visual interest.
Wrap-Up: Get Creative with Your Wood Stacking
So there you have it! Ten fun and creative ways to stack wood that can really jazz up your backyard. Whether you go for a rustic log bench or a stylish vertical display, these ideas can add a unique touch to your outdoor space. Plus, they help keep things organized and tidy. So grab those logs and get to work! Your backyard will thank you, and you might just find a new favorite spot to relax and enjoy the great outdoors. Happy stacking!
Frequently Asked Questions
What are log planters and how can I use them in my yard?
Log planters are hollowed-out logs that you can use to grow plants. They look natural and fit well in any garden, making them a great way to add some greenery.
How can I create a stacked log display?
To make a stacked log display, simply arrange logs in a pile or in creative shapes. You can use them to decorate your garden while keeping the logs organized.
What can I do with logs to make furniture?
You can use logs to create rustic furniture like benches or tables. Just make sure to sand them down for a smooth finish and add cushions for comfort.
How do I build a log fire pit?
To build a log fire pit, stack logs in a circle to create a safe area for a fire. Make sure to leave space for airflow and keep it away from flammable materials.
What is a log border and how can I use it in my garden?
A log border is when you use logs to outline garden beds or paths. It helps keep soil in place and adds a nice look to your garden.
How can I store firewood creatively with logs?
You can build log storage racks to keep your firewood organized and dry. Stack logs vertically or horizontally to create a unique storage solution.