When it comes to yard work, having the right tools is essential. But what’s even more important is knowing how to store them efficiently. A yard tool wall organizer can help you keep everything in its place, making your gardening tasks easier and more enjoyable. In this guide, we’ll walk you through the ins and outs of setting up the ultimate yard tool wall organizer, so you can maximize your space and keep your tools within reach.
Key Takeaways
- Choose an organizer that fits your tool collection and available space.
- Utilize vertical storage options to free up floor space.
- Consider DIY projects to create a personalized organizer.
- Group similar tools together for easy access and efficiency.
- Regularly maintain and reorganize your storage system as needed.
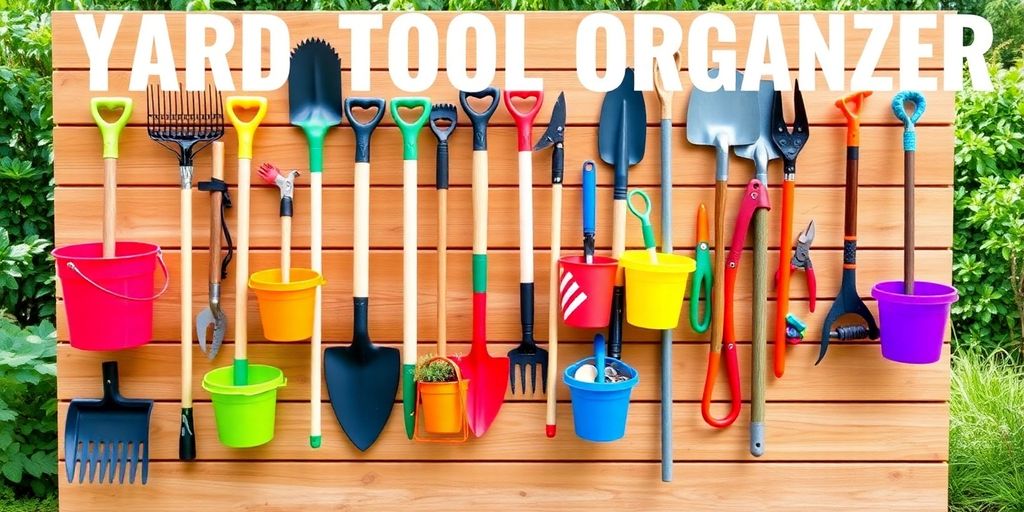
Choosing The Right Yard Tool Wall Organizer
Alright, let’s get down to brass tacks. Picking the right organizer for your yard tools isn’t just about slapping something on the wall; it’s about making your life easier and keeping your tools in tip-top shape. So, where do we start?
Consider Your Tool Collection
First things first, take a good, hard look at what you’re working with. What kind of tools do you have? Are we talking a few lightweight hand trowels and a rake, or a full-blown arsenal including shovels, axes, and maybe even a post-hole digger? The size and weight of your tools will heavily influence the type of organizer you need.
Think about the quantity too. A small organizer might do the trick now, but what happens when you inevitably add to your collection? Planning for the future is always a smart move. Here’s a quick checklist to get you started:
- List all your tools.
- Note their sizes and weights.
- Consider any tools you plan to acquire soon.
Evaluate Available Space
Okay, you know what you need to store. Now, where are you going to store it? Measure the wall space you’re considering. Is it a wide-open area in your garage, or a narrow strip in a shed? Don’t forget to account for things like doorways, windows, and electrical outlets. You don’t want to block access or create a safety hazard.
It’s better to overestimate the space you need than underestimate. Trust me, you’ll appreciate the extra breathing room later on. Plus, a little extra space means you can easily add new tools without having to completely reorganize everything.
Think About Accessibility
This is a big one. What good is an organized wall if you can’t easily grab the tool you need? Consider how often you use each tool. The ones you reach for constantly should be front and center, while the rarely used ones can be tucked away a bit. Also, think about height. Can you comfortably reach the top hooks without a step stool? If not, adjust accordingly. Here are some questions to ponder:
- How often do you use each tool?
- Can you easily reach all the tools?
- Is the organizer located in a convenient spot?
Creative Storage Solutions For Your Yard Tools
Utilizing Vertical Space
Okay, so you’re probably thinking, "Vertical space? Tell me something I don’t know!" But seriously, are you really using it to its full potential? Think about it. Walls are prime real estate. Instead of letting your tools sprawl across the floor, let’s get them up where they belong. Wall-mounted racks and hooks are your best friends here. They’re super easy to install, and they instantly free up a ton of floor space. Plus, it just looks way more organized, right? You can even use a swivel mount bike storage rack to hang things like hoses or even lightweight tools if you get creative. It’s all about thinking up, not out!
Incorporating Shelves and Racks
Shelves and racks are like the bread and butter of organization. You can buy pre-made ones, or if you’re feeling ambitious, build your own! I found some cool garage shelving ideas online last week. The key is to choose shelves that are sturdy enough to hold your heavier tools. Think about what you need to store. Got a bunch of small hand tools? A small shelf unit would be perfect. Need to store bigger items like bags of fertilizer or potting soil? Go for heavy-duty shelving. Don’t forget about overhead racks either! They’re awesome for storing seasonal items or things you don’t use very often. Just make sure you can reach them safely!
Using Pegboards for Flexibility
Pegboards are seriously underrated. They’re like the ultimate customizable storage solution. You can arrange and rearrange the hooks and accessories however you want, whenever you want. Need to move your shovel from one side to the other? No problem! Pegboards are also great because they’re relatively inexpensive and easy to install. You can find them at pretty much any hardware store. Plus, they come in different sizes, so you can find one that fits your space perfectly. I’ve seen people use them to store everything from small hand tools to larger items like rakes and shovels. It’s all about finding the right hooks and accessories for your specific needs. Seriously, give pegboards a try. You won’t regret it!
Think of your yard tool storage like a puzzle. Each tool has its place, and it’s up to you to figure out where it fits best. Don’t be afraid to experiment with different storage solutions until you find what works for you. The goal is to create a system that’s both functional and visually appealing. After all, who doesn’t want a well-organized and tidy yard tool storage area?
DIY Yard Tool Wall Organizer Ideas
Building Your Own Organizer
Okay, so you’re feeling crafty? Awesome! Building your own yard tool organizer is totally doable, and it’s a great way to customize it to exactly what you need. Start by sketching out a design. Think about the tools you have and how much space they take up. You can use wood, metal, or even a combination of both. Pallet wood is a popular choice for a rustic look, and it’s super budget-friendly. Just make sure to sand it down to avoid splinters!
Here’s a simple plan:
- Measure your space and tools.
- Cut the wood to the desired lengths.
- Assemble the frame.
- Add hooks, shelves, or other storage elements.
- Mount it securely to the wall. Remember to use the right hardware for your wall type!
Repurposing Old Furniture
Don’t toss that old bookshelf or cabinet! With a little creativity, you can transform it into a fantastic yard tool organizer. An old ladder can also be repurposed into a cool leaning tool rack. Just add some hooks and you’re good to go. This is a great way to give old items a new life and save some money in the process. Plus, it adds a unique, vintage touch to your garage or shed. Think outside the box – that seasonal storage cabinet could be your next best tool organizer!
Using PVC Pipes for Tool Storage
PVC pipes are surprisingly versatile and perfect for creating individual tool holders. Cut different diameters of PVC pipe into short sections, then mount them vertically or horizontally onto a board. These pipes can hold everything from shovels and rakes to smaller hand tools. It’s a super simple and effective way to keep your tools organized and prevent them from falling over. Plus, PVC is weather-resistant, so it’s a great option for outdoor storage. PVC pipe organizers are also incredibly easy to customize. You can paint them, add labels, or even create different configurations to suit your needs.
Maximizing Efficiency With Tool Zones
Okay, so you’ve got your wall organizer set up, but how do you make it actually useful? The secret is tool zones! Think of it like organizing your kitchen – you wouldn’t keep your pots and pans next to your spices, right? Same idea here. Let’s get into it.
Grouping Similar Tools Together
The first step is to group tools based on what they do. This might seem obvious, but it’s a game-changer. Put all your digging tools (shovels, spades, trowels) in one spot. Keep your pruning tools (shears, loppers, hand pruners) together. Got a bunch of rakes and brooms? They get their own zone too! This way, when you need a specific type of tool, you know exactly where to look. No more rummaging around!
Designating Specific Areas
Now that you’ve got your tool groups, it’s time to assign them specific areas on your wall organizer. Consider how often you use each group. The tools you use most frequently should be in the easiest-to-reach spots. Less frequently used tools can go higher up or lower down. Think about the weight of the tools too. Heavier items should be lower to the ground for safety and ease of access.
Labeling for Easy Access
Don’t underestimate the power of a good label! Seriously, it’s the cherry on top of your organized masterpiece. Grab a label maker (or even just some masking tape and a marker) and clearly label each zone. "Digging Tools," "Pruning Tools," "Rakes & Brooms" – you get the idea. This is especially helpful if you have other people using the tools, like family members or roommates. Plus, it’ll help you remember where everything goes when you’re putting tools away. Trust me, future you will thank you for this!
Maintenance Tips For Your Yard Tool Wall Organizer
Okay, so you’ve got your yard tools all neatly organized on the wall – awesome! But don’t just set it and forget it. A little maintenance goes a long way in keeping your organizer in tip-top shape and your tools ready for action. Let’s dive into some easy maintenance tips.
Regular Cleaning Practices
Think of your yard tool organizer like your car – it needs a wash every now and then. Dust and dirt can build up, especially if your organizer is in a garage or shed. Here’s a simple routine:
- Wipe down the organizer with a damp cloth every month or so. This prevents grime from setting in.
- Use a brush to get into any nooks and crannies. A toothbrush works great for this!
- For metal organizers, consider using a rust inhibitor spray a couple of times a year. This will keep things looking shiny and new.
Inspecting for Damage
Give your organizer a quick once-over every few months. Look for these common issues:
- Loose screws or brackets: Tighten them up! A wobbly organizer isn’t doing anyone any good.
- Cracks or breaks in the material: If you spot any serious damage, consider repairing or replacing the affected part. Ignoring it could lead to bigger problems down the road.
- Rust or corrosion: Address it ASAP with a wire brush and some rust-resistant paint. Prevention is key!
Reorganizing as Needed
Sometimes, your tool collection changes, or you realize a better way to arrange things. Don’t be afraid to declutter your garage and switch things up!
- Assess your current layout: Is everything easily accessible? Are there tools you rarely use taking up prime real estate?
- Move things around to better suit your needs. Maybe group your most-used tools together, or move heavier items lower down for easier lifting.
- Consider adding or removing hooks, shelves, or other accessories as needed. Your organizer should evolve with your tool collection.
Keeping your yard tool wall organizer in good shape isn’t just about aesthetics; it’s about safety and efficiency. A well-maintained organizer keeps your tools accessible, prevents accidents, and extends the life of both your tools and the organizer itself. Plus, it just feels good to have a tidy workspace!
Budget-Friendly Yard Tool Organization
Affordable Storage Options
Okay, so you want to get your yard tools organized without emptying your wallet? I get it! There are tons of ways to do this. Think about repurposing things you already have. Old shelves from inside the house? Perfect for the garage! Plastic bins are your friend, too. Check out discount stores; you can usually find them super cheap. Don’t underestimate the power of simple wall hooks either. They’re inexpensive and can hold a surprising amount of stuff.
DIY Projects on a Budget
If you’re even a little bit handy, DIY is the way to go. You can build a simple rack out of scrap wood – seriously, even if you’re not a master carpenter, it’s doable. Pallets are another great resource. You can often get them for free, and with a little work, they make awesome tool organizers. Plus, there are a million tutorials online to guide you. Get creative! Think outside the box and see what you can come up with.
Thrifting for Organizers
Don’t forget about thrift stores and garage sales! You can often find amazing deals on storage containers, shelves, and even old toolboxes. It might take a little digging, but it’s worth it when you score a great find for next to nothing. Plus, it’s a fun way to spend a Saturday morning. You might even find some vintage tool organizers that add a cool touch to your garage!
Enhancing Aesthetic Appeal With Your Organizer
Okay, so you’ve got your yard tools organized – awesome! But let’s be real, nobody wants a storage solution that’s an eyesore. Let’s talk about making your organizer look good, too. It’s all about blending function with style, so your storage isn’t just practical, it actually enhances your space.
Choosing Stylish Designs
Think about the overall look you’re going for. Do you want something rustic, modern, or maybe a bit quirky? There are tons of organizers out there, so don’t settle for something boring. Consider the material, the shape, and how it complements your yard or garage. For example, a sleek metal organizer might look great in a modern garage, while a wooden one could fit perfectly in a more traditional setting.
Incorporating Color and Decor
Color can make a huge difference! You could paint your organizer to match your house, or choose a bold color to make it a focal point. Add some decorative touches, too. Think about adding some cool labels, or even some small potted plants on a shelf. It’s all about making it your own.
Creating a Cohesive Look
Make sure your organizer fits in with the rest of your space. If your garage is already super organized, you’ll want an organizer that matches that level of tidiness. If your shed is more rustic, a simple wooden organizer might be the way to go.
Think about the overall theme of your outdoor space. Is it modern and minimalist, or more of a cozy, garden-inspired vibe? Your organizer should complement that theme, not clash with it. This might involve choosing specific materials, colors, or even adding decorative elements that tie everything together.
Here are some ideas to get you started:
- Paint your organizer a color that complements your home’s exterior.
- Add some decorative labels to your tool slots.
- Hang a small string of lights around the organizer for a touch of whimsy.
Don’t be afraid to get creative and have fun with it! After all, effective garage tool storage systems should be both functional and visually appealing.
Wrap-Up: Your Organized Yard Awaits!
So there you have it! Organizing your yard tools doesn’t have to be a chore. With a little creativity and some simple storage solutions, you can turn that cluttered wall into a neat and tidy space. Remember, the goal is to make your tools easy to find and keep your yard looking sharp. Whether you go for pegboards, hooks, or shelves, just pick what works best for you. And hey, once you get everything sorted out, you might even find yourself spending more time in the garden. Happy organizing!
Frequently Asked Questions
What is a yard tool wall organizer?
A yard tool wall organizer is a system that helps you store and organize your gardening tools on a wall, making them easy to find and access.
How do I choose the right organizer for my tools?
Consider the types and sizes of your tools, the space you have available, and how often you need to access them.
Can I make my own yard tool organizer?
Yes! You can build your own organizer using materials like wood, pegboards, or even repurposed furniture.
What are the benefits of using a wall organizer?
A wall organizer saves space, keeps your tools visible and accessible, and helps prevent damage to your tools.
How do I keep my tool organizer clean?
Regularly wipe down the organizer and tools to remove dirt and debris. Check for any damage and fix it right away.
Are there budget-friendly options for organizing tools?
Yes! You can find affordable storage solutions at local stores, or you can create your own using items you already have.