If you’re tired of tripping over bikes and gear in your garage, it’s time to get organized. Bike hooks for garage storage can be a game-changer, helping you reclaim valuable space while keeping your bikes safe and accessible. With so many options available, finding the right hooks can feel overwhelming. This guide will help you navigate through the choices and find the best solutions for your garage needs.
Key Takeaways
- Consider the size and type of your bikes before choosing hooks.
- Look for hooks with a high weight capacity to ensure safety.
- Select durable materials that can withstand wear and tear.
- Installation should be straightforward, so check for included tools and instructions.
- Explore creative storage solutions by combining hooks with shelves or other organizers.
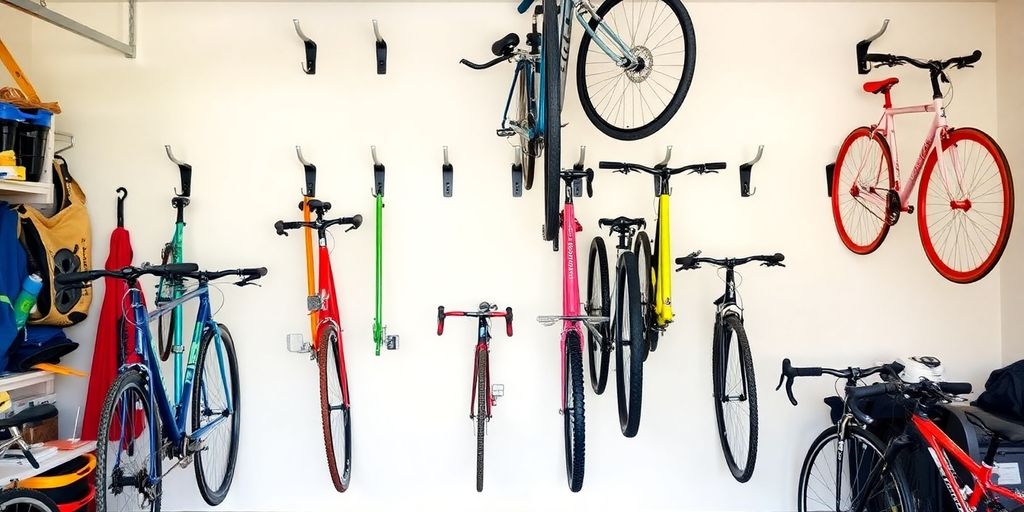
Choosing The Right Bike Hooks For Garage
Alright, let’s get down to business. You’re ready to reclaim your garage space, and bike hooks are your weapon of choice. But before you go wild buying every hook in sight, let’s think this through. Picking the right bike hooks isn’t just about sticking something in the wall; it’s about making your life easier and your garage more functional. Trust me, a little planning goes a long way.
Understanding Your Space Needs
First things first: take a good, hard look at your garage. How much free wall or ceiling space do you actually have? Are we talking a sprawling three-car garage, or a cozy one-car situation? Think about what else needs to fit in there – your car (obviously!), tools, lawn equipment, that pile of stuff you swear you’ll sort through someday… You need to consider the layout and how much room you can realistically dedicate to bike storage.
- Measure the available wall or ceiling space.
- Consider the traffic flow in your garage.
- Think about future storage needs.
Evaluating Bike Sizes and Types
Not all bikes are created equal, right? A lightweight road bike is a whole different beast than a burly mountain bike or a beach cruiser. And a kid’s bike? Even smaller. You’ll need to consider the weight and size of your bikes when choosing hooks. Some hooks are designed for heavier bikes, while others are better suited for lighter models. Also, think about tire width – those fat tires on your mountain bike might not fit on a standard hook. For example, the Wallmaster vertical wall mount is designed to accommodate various bike sizes.
Here’s a quick rundown:
- Road Bikes: Lighter, narrower tires.
- Mountain Bikes: Heavier, wider tires.
- Cruisers: Often heavier, wider tires, sometimes with fenders.
- Kids’ Bikes: Smaller, lighter.
Considering Aesthetic Preferences
Okay, so maybe aesthetics aren’t your top priority for garage storage, but hey, it doesn’t hurt to have things look nice, right? If your garage is also your workshop or a space you spend a lot of time in, you might want to consider hooks that are a bit more visually appealing. Some hooks come in different colors or finishes, and some are designed to be more discreet than others. If you’re storing bikes indoors, this becomes even more important. You can find sleek, modern options that look great in your living space.
Don’t underestimate the power of a well-organized and visually appealing garage. It can make working on projects more enjoyable and even inspire you to keep things tidy. Plus, it’s just nice to walk into a space that doesn’t feel like a disaster zone.
Top Features To Look For In Bike Hooks
Alright, so you’re ready to get those bikes up off the floor, awesome! But before you just grab any old hook, let’s talk about what makes a great bike hook. It’s not just about hanging something on the wall; it’s about doing it safely and efficiently. Here’s what to keep in mind:
Weight Capacity Matters
This one’s pretty straightforward, but super important. You need to make sure the hook you choose can actually handle the weight of your bike. Check the manufacturer’s specs, and don’t just assume. Road bikes are lighter, but mountain bikes or e-bikes? They can be surprisingly heavy. It’s always better to overestimate than underestimate. Think about it – you don’t want your prized possession crashing down in the middle of the night! Also, consider the wall itself. Drywall alone won’t cut it; you’ll need to anchor into a stud or use appropriate drywall anchors.
Material Durability
Okay, so the hook can hold the weight, great. But what’s it made of? Is it going to rust after a few months in a humid garage? Probably not ideal. Look for hooks made from sturdy stuff like steel, and ideally with some kind of coating to protect against rust and scratches. Rubberized coatings are great because they also protect your bike’s frame from getting dinged up. Nobody wants scratches on their bike, right?
Ease of Installation
Let’s be real, nobody wants to spend hours wrestling with complicated instructions and weird hardware. The easier the installation, the better. Look for hooks that come with clear instructions and all the necessary mounting hardware.
I’ve installed a few different types of bike hooks, and let me tell you, some are way easier than others. The ones that require you to drill pilot holes and then screw in the hook are generally the most secure, but there are also some cool no-drill options out there if you’re renting or just don’t want to mess with power tools. Just make sure those no-drill options are really rated for the weight of your bike!
Here’s a quick comparison of installation methods:
| Method | Pros | Cons |
|---|---|---|
| Screw-in | Very secure, high weight capacity | Requires drilling, more time-consuming |
| No-drill anchors | Easy to install, no drilling needed | Lower weight capacity, may not be as secure |
| Track Systems | Adjustable, can hold multiple bikes | More expensive, requires more planning |
Also, think about how easy it is to actually get your bike on and off the hook. Some hooks require you to lift the bike really high, which can be a pain if you have a heavy bike or a bad back. Others let you roll the bike onto the hook, which is much easier. Consider your own strength and mobility when making your choice. After all, you want to be able to grab your bike and go for a ride without any hassle! Consider innovative garage space to make the most of your space.
Creative Ways To Use Bike Hooks
Bike hooks aren’t just for bikes! Let’s explore some outside-the-box ideas to really maximize your garage space. It’s time to get creative and think beyond the obvious.
Vertical Storage Solutions
Okay, so vertical bike storage is the main reason you’re here, right? But let’s dig a little deeper. Think about how you can arrange your bikes. Do you have a mix of adult and kids’ bikes? Staggering the heights can save space. Also, consider the Impresa Bike Hooks that allow you to hang bikes vertically. This is a game-changer if floor space is at a premium.
Multi-Purpose Hooks
This is where it gets fun. Bike hooks, especially the heavy-duty ones, can hold a surprising amount of stuff. Think about:
- Ladders: Those bulky ladders can finally get off the floor.
- Gardening Tools: Shovels, rakes, and hoes can hang neatly.
- Sports Equipment: Baseball bats, hockey sticks, even skateboards can find a home.
I even saw someone use them to hang camping chairs! Just make sure whatever you’re hanging is within the weight capacity of the hook, and that it’s securely mounted. Safety first, always!
Combining Hooks With Shelving
Now we’re talking next-level organization! Imagine a setup where you have a shelf above your hanging bikes. You could store bike helmets, gloves, and other cycling gear right there. Or, use the shelves for general storage and the hooks for bikes and other long-handled items. It’s all about creating a system that works for your stuff. Think about using slotted hooks for extra security.
Best Bike Hooks For Garage Organization
Alright, let’s talk about the fun part: picking out the actual bike hooks! There are tons of options, and finding the right ones can really make a difference in how well your garage works for you. We’ll break it down into a few categories to make it easier.
Affordable Options
Okay, so you don’t want to break the bank? I get it. Luckily, there are some great budget-friendly options out there that still do the job. These are perfect if you’re just starting out or need to store a bunch of bikes without spending a fortune.
- Simple Hooks: These are your basic, rubber-coated hooks that screw into the wall or ceiling. They’re super easy to install and surprisingly sturdy. The Park Tool 451 Bike Storage Hook is a great example. You can usually find them in multi-packs, which is a bonus.
- Pulley Systems: A bit more involved than simple hooks, but still affordable. These let you lift your bike up to the ceiling, which is awesome if you have high ceilings. They’re great for bikes you don’t use super often.
- Consider the Impresa Products 4-Pack Bike Hook/Hanger: These heavy-duty, rubber-coated steel hooks claim to support up to 100 lbs and can be mounted to the ceiling or the wall to hang your bikes vertically. They work with any size or style of bike and can fit tires up to 4 inches in width.
Premium Choices
If you’re willing to spend a little more, you can get some seriously nice bike hooks. These often have better materials, smarter designs, and just look nicer overall. If you’re storing your bikes inside your house, appearance may be a factor.
- Steadyrack: These are super popular for a reason. They let you pivot your bike to the side, which saves space and makes it easier to get your bike in and out. They’re a bit pricey, but a lot of people swear by them.
- Freestanding Racks: While not technically hooks, these are a great option if you don’t want to drill into your walls. They’re sturdy and can hold multiple bikes.
- Wall-Mounted Racks with Shelves: These are awesome because they not only store your bikes but also give you extra shelf space for helmets, shoes, and other gear.
Innovative Designs
Sometimes, you just want something a little different. These bike hooks stand out from the crowd with their unique features and designs.
- Folding Bike Racks: These racks fold up when you’re not using them, which is great if you need to maximize space. They’re perfect for small garages or apartments.
- Hidden Bike Storage: Some companies make bike racks that look like shelves or cabinets when closed. It’s a cool way to keep your bikes out of sight when you’re not using them.
- Gravity Stands: These stands use gravity to hold your bike in place, so you don’t have to lift it up high. They’re great for people with heavy bikes or limited strength.
No matter what type of bike hooks you choose, make sure they’re strong enough to hold your bikes and that they’re installed properly. It’s always better to be safe than sorry!
Installation Tips For Bike Hooks
Alright, you’ve picked out the perfect bike hooks – awesome! Now, let’s get them installed so you can reclaim your garage space. Don’t worry, it’s easier than you think. Here’s a breakdown to make the process smooth and maybe even a little fun.
Finding The Right Location
First things first, scope out your garage. Think about where the bikes will be least in the way. Consider things like car doors opening, walking paths, and other storage. You’ll want to make sure you have enough clearance so you’re not constantly bumping into your bikes. Also, think about how high you want to hang them. Can you easily lift your bike to that height, or will you need a step stool every time?
Tools You’ll Need
Okay, gather your gear! Here’s a basic list to get you started:
- Drill (with various drill bits)
- Stud finder
- Level
- Pencil
- Measuring tape
- Screwdriver (or drill with screwdriver bits)
- Safety glasses (seriously, wear them!)
Depending on the type of wall you’re working with (drywall, concrete, etc.), you might need different anchors or specialized drill bits. Check the instructions that came with your bike hanger for specifics.
Step-By-Step Installation Guide
Alright, let’s get down to business:
- Find those studs! Use your stud finder to locate the studs in your wall or ceiling. This is super important because you need a solid anchor point to support the weight of your bike. Nobody wants a bike falling on their car (or head!).
- Mark the spot. Once you’ve found a stud, use your pencil to mark the exact location where you want to install the hook. Double-check your measurements to make sure everything is aligned correctly.
- Drill a pilot hole. Use a drill bit slightly smaller than the screw size that came with your bike hook. This makes it easier to screw in the hook and prevents the wood from splitting.
- Install the hook. Screw the bike hook into the pilot hole. Make sure it’s nice and snug, but don’t overtighten it, or you could strip the screw or damage the wall.
- Test it out. Before you hang your bike, give the hook a good tug to make sure it’s securely installed. If it feels wobbly, you might need to use a different anchor or find a different stud.
- Hang your bike! Carefully lift your bike and place the wheel (or frame, depending on the hook type) onto the hook. Make sure the bike is stable and secure before letting go.
Remember, safety first! If you’re not comfortable using power tools or working on a ladder, don’t hesitate to ask a friend or hire a professional to help. It’s better to be safe than sorry!
Maintaining Your Bike Hooks
Okay, so you’ve got your bikes all neatly hung up, looking good, and saving space. Awesome! But don’t just set it and forget it. A little bit of maintenance will keep those bike hooks working great for years to come. It’s super easy, I promise!
Regular Inspections
Give your bike hooks a quick once-over every few months. Check for any signs of wear and tear. Are the hooks still securely fastened to the wall or ceiling? Look for cracks in the rubber coating (if your hooks have them) or any bending of the metal. If you spot anything that looks off, address it sooner rather than later. It’s way easier to tighten a screw than to deal with a bike falling off the wall!
Cleaning Tips
Garage environments can get dusty and grimy, so your bike hooks will probably need a cleaning every now and then. Just wipe them down with a damp cloth to remove any dirt or debris. For tougher grime, you can use a mild soap solution. Make sure to dry the hooks thoroughly after cleaning to prevent rust or corrosion, especially if they’re made of metal.
When To Replace
Even with the best care, bike hooks won’t last forever. Keep an eye out for these signs that it’s time for a replacement:
- Significant rust or corrosion.
- Cracks or breaks in the metal or coating.
- Loose or wobbly mounting, even after tightening.
- If the weight capacity is exceeded.
Replacing a bike hook is a small price to pay for the safety of your bikes and everything else in your garage. Don’t wait until a hook fails completely – be proactive and swap it out when you see signs of wear. It’s a quick and easy job that can save you a lot of hassle in the long run.
Maximizing Garage Space With Bike Hooks
Organizing Other Gear
Okay, so you’ve got your bikes up on hooks, awesome! But let’s be real, the garage is never just about the bikes, is it? Think about all that other stuff lurking in the corners: helmets, bike pumps, maybe even some camping gear. Bike hooks can actually help with this too! Use smaller hooks to hang helmets right next to the bikes. Got a bike pump with a loop? Hang it! Suddenly, everything bike-related is in one organized spot. It’s like magic, but with hooks.
Creating A Functional Layout
Think of your garage as a puzzle. Bike hooks are a piece of that puzzle, but how do they fit with everything else? Consider the flow of your garage. Can you easily get your car in and out? Can you grab your gardening tools without tripping over a bike? The goal is to create zones. Bike zone, tool zone, maybe even a "stuff we don’t know what to do with" zone. By using bike hooks to get the bikes out of the way, you free up floor space to define these zones and make your garage way more functional.
Incorporating Additional Storage Solutions
Bike hooks are great, but they’re not the only answer. Think about combining them with other storage solutions. Shelving units above the bikes can hold bike accessories, cleaning supplies, or even seasonal decorations. Pegboards are awesome for hanging tools and keeping them within easy reach. And don’t forget about overhead storage racks for those bulky items you only need a few times a year. By layering your storage, you can truly maximize every inch of your garage space. It’s all about working smarter, not harder!
Wrap-Up: Get Organized and Ride On!
So there you have it! With the right bike hooks, you can turn your garage from a cluttered mess into a neat and organized space. Whether you go for simple hooks or something a bit fancier, the key is to find what works best for you and your bikes. Remember, a little organization goes a long way in making your life easier. Plus, it feels great to have everything in its place. So grab those hooks, get to work, and enjoy the extra space in your garage. Happy riding!
Frequently Asked Questions
What are bike hooks used for?
Bike hooks are used to hang bikes on walls or ceilings to save space and keep them organized.
How do I choose the right bike hooks?
Consider your available space, the size of your bike, and how you want your garage to look.
Are bike hooks easy to install?
Yes, most bike hooks are easy to install with basic tools, but you may need to drill holes.
Can I use bike hooks for other items?
Yes, bike hooks can also be used to hang other items like tools or sports equipment.
What weight can bike hooks hold?
Most bike hooks can hold up to 100 lbs, but check the product details for specific limits.
How do I maintain my bike hooks?
Regularly check your hooks for wear, clean them, and replace them if they show signs of damage.