Is your garage a chaotic mess, with bikes taking up all the floor space? You’re not alone. It’s a common problem for many homeowners. But what if I told you there’s a simple, affordable fix that can totally change your garage game? We’re talking about bunnings bike wall hooks. These little things are super handy for decluttering and making the most of your vertical space. Let’s dive into how these hooks can help you get your garage organized and your bikes stored properly.
Key Takeaways
- Wall hooks are a simple way to clear up floor space and keep bikes safe.
- Bunnings has different hook styles, so pick one that fits your bike and can hold its weight.
- Installation is easy; just gather your tools, find a good spot, and mount them securely.
- Hooks aren’t just for bikes; use them for helmets, tools, and other gear.
- Combine hooks with shelves and plan your layout for a super organized garage.
Why Wall Hooks Are a Game Changer
Okay, let’s be real – garages can quickly turn into chaotic dumping grounds. Bikes end up leaning precariously against cars, tripping hazards abound, and finding anything becomes a treasure hunt. But fear not! Wall-mount bike hooks are here to revolutionize your garage situation. They’re not just a storage solution; they’re a total game changer.
Reclaim Your Floor Space
Seriously, think about all that glorious floor space currently occupied by your bikes. Imagine what you could do with it! Set up a workbench? Finally get that home gym going? Actually park your car inside? Wall hooks lift your bikes up and out of the way, instantly freeing up valuable real estate. It’s like magic, but with power tools.
Keep Bikes Safe and Sound
Let’s face it, bikes on the floor are just begging to be knocked over, scratched, or otherwise abused. Kids, pets, rogue basketballs – they’re all potential bike-damaging hazards. Hanging your bikes securely on the wall keeps them safe from accidental bumps and scrapes. Plus, it just looks more organized and cared for, right?
Easy Access to Your Ride
No more wrestling your bike out from behind a pile of boxes! With wall hooks, your bike is always ready to go. Just grab it off the hook, and you’re off on your next adventure. This ease of access can actually encourage you to ride more often. Think about it: less hassle, more cycling!
Finding the Perfect Bunnings Bike Wall Hooks
Exploring Different Hook Styles
Okay, so you’re ready to ditch the bike clutter and embrace the wall hook life! Awesome! Bunnings has a bunch of options, so let’s break it down. You’ll find everything from simple J-hooks that hold your bike by the frame, to more elaborate pulley systems that lift your bike up and out of the way. There are even hooks designed to hold your bike horizontally, which can be great if you’ve got the wall space. Think about how you want to lift and store your bike.
- J-Hooks: Simple and affordable, good for basic storage.
- Pulley Systems: Great for high ceilings and heavier bikes.
- Horizontal Hooks: Space-saving if you have the wall length.
Considering Your Bike Type
Not all bikes are created equal, and neither are bike hooks! A lightweight road bike will be fine with a basic hook, but a heavy mountain bike or e-bike? You’ll need something sturdier. Think about the frame shape too. Some hooks are better suited for certain frame designs. Check the product descriptions carefully to make sure the hook is compatible with your specific bike. Don’t just grab the first one you see!
Checking Weight Capacity
This is super important. Ignoring the weight capacity is a recipe for disaster (and a potentially damaged bike). Always check the maximum weight the hook can handle and make sure it exceeds the weight of your bike. It’s better to be safe than sorry! Also, consider the wall you’re mounting it on. A solid brick wall is going to be much stronger than drywall, so factor that into your decision.
It’s always a good idea to add a little buffer to the weight capacity. If your bike weighs 20kg, don’t get a hook rated for exactly 20kg. Go for something that can handle 25kg or more, just to be on the safe side. This will give you peace of mind knowing your bike is securely stored.
Simple Steps to Install Your Hooks
Gathering Your Tools
Alright, let’s get started! First things first, you’ll want to gather all your tools. Nothing’s worse than getting halfway through a project and realizing you’re missing something. Here’s a quick checklist:
- A drill (cordless is super handy).
- A stud finder (unless you’re mounting on concrete or brick).
- A level (to make sure your bikes hang straight).
- A measuring tape.
- A pencil.
- Safety glasses (seriously, protect those eyes!).
- The screws and wall plugs that came with your Bunnings bike hooks (or appropriate ones for your wall type).
Choosing the Right Spot
Location, location, location! Think about where you want your bikes to live. Consider these points:
- Make sure there’s enough space to easily get the bikes in and out. You don’t want to be wrestling with them every time.
- Check for studs if you’re mounting on drywall. Use that stud finder! If no studs, use appropriate wall anchors.
- Avoid areas where you might bump into the bikes or where they’ll block access to other stuff.
- Think about the height. Can you comfortably lift your bike to that height? Maybe get a friend to help you test it out.
Securely Mounting Your Hooks
Okay, time to get those hooks up! This is where precision matters, so take your time.
- Mark the spot: Use your measuring tape and pencil to mark exactly where you want the hook to go. Use the level to ensure it’s straight.
- Pre-drill holes: If you’re using wall plugs, pre-drill holes according to the plug size. If you’re hitting a stud, you might not need to pre-drill, but it can still help.
- Attach the hooks: Screw the hooks into the wall, making sure they’re nice and snug. If you’re using wall plugs, insert them before screwing in the hooks.
- Give it a test: Before hanging your bike, give the hooks a good tug to make sure they’re secure. Better safe than sorry!
Mounting on brick or concrete? You’ll need a hammer drill and appropriate masonry drill bits and wall plugs. It’s a bit more involved, but totally doable! Just make sure you wear those safety glasses – concrete dust is no joke.
Beyond Just Bikes: More Storage Ideas
Hanging Helmets and Gear
Okay, so you’ve got your bikes up on the wall, looking all neat and tidy. But what about all the other cycling stuff? Helmets, shoes, gloves, that weird little multi-tool you never use but can’t throw away? Don’t let them clutter up the floor!
- Use small hooks or a mesh bag to hang helmets near the bikes.
- Install a small shelf above the bikes for shoes and gloves.
- Consider a dedicated basket or bin for smaller items like tools and spare tubes.
Think vertically! The space above your bikes is prime real estate for storing all your cycling accessories. A little bit of organization goes a long way in keeping everything accessible and off the floor.
Utilizing Vertical Space for Tools
Bike hooks are great, but let’s face it, garages are tool central. Why not use the same vertical storage principles for your gardening tools, yard tool wall organizer, and other equipment?
- Pegboards are your best friend here. They’re super versatile and you can customize them to fit any tool.
- Long-handled tools like shovels and rakes can be hung with simple hooks.
- Consider a magnetic strip for smaller metal tools like screwdrivers and wrenches.
Creating a Dedicated Cycling Zone
Why not make a whole cycling zone? It’s not just about storage; it’s about creating a space that makes you want to get out and ride. Think of it as your personal cycling command center!
- Add a small workbench for bike maintenance and repairs.
- Include a comfortable chair or stool for those longer repair sessions.
- Hang a whiteboard or corkboard to track your rides, goals, or even just inspirational cycling quotes.
Maximizing Your Garage Layout
Combining Hooks with Shelving
Okay, so you’ve got your bike hooks up – awesome! But let’s take it a step further. Think about combining those hooks with some shelving units. It’s like peanut butter and jelly for garage organization. You can use the shelves above the bikes for helmets, shoes, or even bike maintenance supplies. Below the bikes, consider a small workbench or a rolling tool chest. This creates a super functional zone for all things cycling.
- Shelving above for smaller items
- Workbench below for repairs
- Rolling tool chest for easy access
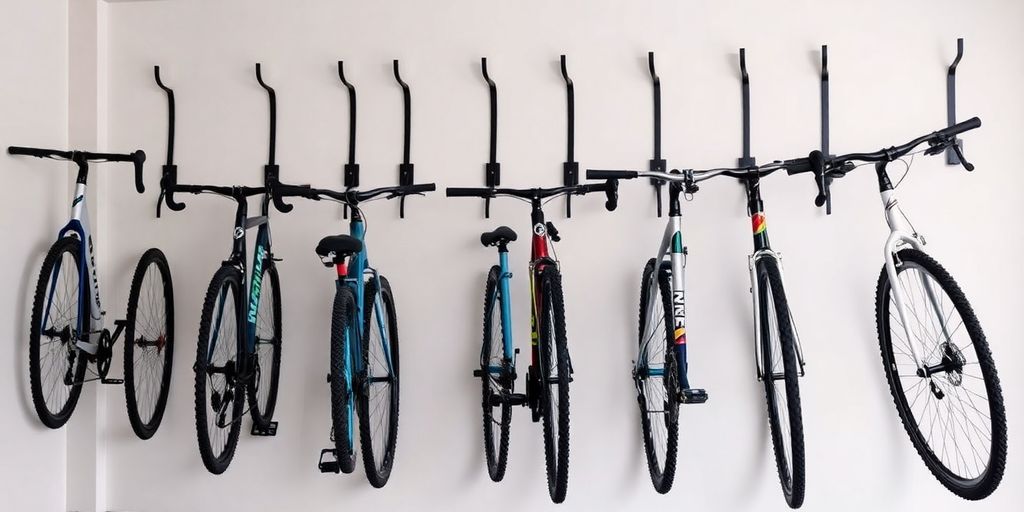
Smart Placement for Multiple Bikes
Got more than one bike? No problem! The key is strategic placement. Staggering the heights of the hooks can help prevent handlebar collisions and make it easier to get each bike down. Also, consider the weight distribution. Heavier bikes might be better closer to the ground, while lighter ones can go higher up. Think about how often you use each bike, too. The one you ride daily should be the easiest to access. You can even find a 2 bike wall rack to help with this.
- Stagger hook heights
- Consider weight distribution
- Prioritize access based on usage
Designing for Future Needs
Garages have a funny way of filling up, don’t they? When you’re setting up your bike storage, think about the future. Are you planning on getting another bike? Will you need more space for tools or other gear? Leaving some extra room now can save you a headache later. Maybe install a few extra hooks, even if you don’t need them right away. Or consider a modular shelving system that you can easily expand.
Planning ahead is always a good idea. Think about your future storage needs and leave some room to grow. It’s easier to do it now than to completely reorganize later.
- Anticipate future bike purchases
- Consider additional storage needs
- Opt for modular and expandable systems
Tips for a Tidy and Organized Garage
Regular Decluttering Habits
Okay, let’s be real, garages can become black holes for stuff. The key to keeping it all under control? Regular decluttering. I’m not talking about a massive, all-day event every six months. Think smaller, more frequent purges.
- Set a reminder on your phone to spend 15-20 minutes each week going through a specific section of your garage.
- Have a designated "donate" or "trash" bin ready to go. If you haven’t used something in a year, seriously consider if you really need it.
- Don’t be afraid to ask yourself the tough questions: "Does this still work?", "Do I even remember buying this?", "Could someone else use this more than me?"
Decluttering isn’t just about getting rid of things; it’s about creating a space that’s functional and enjoyable to be in. Plus, you might even find some long-lost treasures in the process!
Labeling Your Storage Areas
This is a game-changer, trust me. Once you’ve decluttered and organized, labeling everything is essential. It might seem tedious at first, but it’ll save you so much time and frustration in the long run. No more rummaging through unmarked boxes trying to find that one specific thing!
- Use a label maker for a clean, professional look. You can find them pretty cheap these days.
- If you don’t have a label maker, masking tape and a permanent marker work just fine. Just make sure the writing is clear and easy to read.
- Be specific with your labels. Instead of just "Tools," try "Gardening Tools" or "Power Tools."
Making the Most of Every Corner
Garages often have weird nooks and crannies that go unused. Time to change that! Think vertically and creatively to maximize every inch of your space. Consider adding garage shelving to take advantage of vertical space.
- Corner shelves are great for storing smaller items that tend to get lost in the shuffle.
- Hang hooks on the sides of cabinets or shelves to hold things like extension cords or bike helmets.
- Use stackable bins to create a mini-storage tower in a corner. This is perfect for seasonal decorations or sports equipment.
Real-Life Success Stories with Bunnings Bike Wall Hooks
Inspiration from Fellow Enthusiasts
It’s one thing to talk about how great these bike hooks are, but it’s another to see them in action! I’ve been scouring forums and social media, and the results are seriously impressive. People are transforming their garages from cluttered chaos to organized havens, all thanks to some well-placed Bunnings bike wall hooks. It’s amazing what a difference a little vertical storage can make.
- One user, let’s call him Mark, managed to fit four bikes in his single-car garage using a combination of vertical and horizontal hook setups. He even color-coded the hooks to match each bike!
- Another enthusiast, Sarah, created a dedicated bike maintenance station right next to her wall-mounted bikes. Talk about convenience!
- And then there’s Dave, who used the hooks to display his vintage bike collection like artwork. Seriously, it looked like a museum!
Seeing these setups really drives home the point: these hooks aren’t just about storage; they’re about reclaiming your space and making your garage work for you.
Showcasing Creative Setups
Okay, let’s get into some specifics. I’ve seen some seriously creative uses of these hooks that I just have to share:
- The "Family Bike Rack": One family installed a row of hooks at varying heights to accommodate bikes of all sizes, from kids’ balance bikes to adult mountain bikes. It’s a perfect way to keep everyone’s ride organized and accessible.
- The "Minimalist Marvel": Another user went for a super clean look, using only two hooks per bike to create a floating effect. It’s simple, elegant, and incredibly space-efficient.
- The "Gear Organizer": Some people have even combined the bike hooks with other storage solutions, like shelves and pegboards, to create a complete cycling zone. Helmets, shoes, and tools all have their place, making it easy to grab your gear and go.
Before and After Transformations
Nothing tells a story quite like a good before-and-after. I’ve seen some truly dramatic garage transformations thanks to these Bunnings bike wall hooks.
- Imagine a garage floor completely covered in bikes, tools, and random clutter. Now picture that same space with the bikes neatly hanging on the wall, the floor clear, and everything in its place. That’s the power of these hooks!
- One user shared a photo of their garage before installing the hooks, and it was almost unrecognizable. After? A clean, organized space with room for the car and the bikes. It’s like magic!
- The best part is that these transformations aren’t just about aesthetics. They’re about making your garage a more functional and enjoyable space. No more tripping over bikes or struggling to find your tools. Just a clean, organized area where you can easily access your gear and get ready for your next ride.
Ready to Get Your Garage in Shape?
So, there you have it! Getting your garage organized doesn’t have to be a huge, scary project. With some simple Bunnings bike wall hooks, you can totally change how much space you have. It’s pretty cool how a small change can make such a big difference, right? You’ll love having a tidy garage where everything has its own spot. Plus, finding your bike will be super easy. Go on, give it a try this weekend. You’ll be glad you did!
Frequently Asked Questions
Why should I use wall hooks for my bike storage?
Wall hooks are super helpful because they get your bikes off the floor, making your garage feel much bigger and less cluttered. It’s like magic for your space!
What kinds of bike wall hooks can I find at Bunnings?
Bunnings has lots of different hooks! Some let your bike hang straight up and down, while others hold it out from the wall. Think about how much space you have and how often you use your bike when picking one out.
Do I need to worry about how heavy my bike is when choosing a hook?
Yep! Before you buy, check the package to see how much weight the hook can hold. This makes sure it’s strong enough for your bike, especially if you have a heavier mountain bike or an e-bike.
Is it hard to put these hooks up myself?
Installing them is pretty easy. You’ll need some basic tools like a drill and a level. The most important part is finding a strong spot on your wall, like a wood stud, to make sure the hook stays put.
Can I use these hooks for other things besides bikes?
Absolutely! Wall hooks aren’t just for bikes. You can use them to hang helmets, bike bags, or even other garage tools like rakes and shovels. It helps keep everything neat and off the floor.
What are some tips for keeping my garage organized after I install the hooks?
To keep your garage really tidy, try to put things back in their spot after you use them. You can also label areas or containers so everyone knows where things go. A little effort goes a long way!