Living in a city often means dealing with cramped spaces, especially when it comes to storing your bicycle. A bicycle wall clip can really help you out here, letting you keep your bike off the floor and freeing up valuable space. In this article, we’ll look at how to pick the best bicycle wall clip, creative storage ideas, top brands, installation tips, and maintenance advice. Let’s get started!
Key Takeaways
- Select a bicycle wall clip that suits your wall material and bike size.
- Get inventive with vertical and horizontal bike storage methods.
- Check out brands known for durability and positive user feedback.
- Follow installation guidelines to ensure safety and effectiveness.
- Consider compact designs to make the most of your small living area.
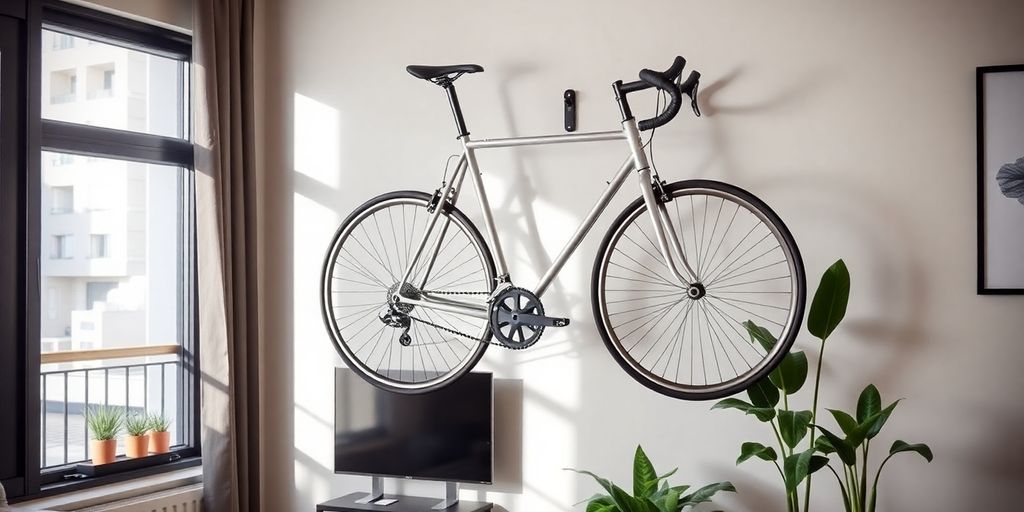
Bicycle Wall Clip Solutions For Small Apartments
Compact Designs
Okay, so you’re living in a small apartment, and space is tight. Don’t worry, there are bike wall clips designed just for you! We’re talking about minimalist designs that practically disappear when not in use. Think sleek, single-hook systems or folding racks that hug the wall. These are great because they keep your bike secure without hogging precious square footage. I’ve seen some that are so small, you barely notice them. It’s all about maximizing what you’ve got!
Multi-Functional Options
Why settle for just a bike rack when you can have something that does double duty? Some wall clip designs come with built-in shelves or hooks. This means you can store your helmet, keys, or even a plant right alongside your bike. It’s a smart way to keep things organized and make the most of your wall space. I’m a big fan of anything that can serve more than one purpose, especially in a small space.
Space-Saving Techniques
Alright, let’s get strategic. Here are some ideas to really optimize your small apartment:
- Vertical stacking: If you have multiple bikes, consider a system that lets you stack them vertically. This uses height instead of width, freeing up floor space.
- Corner placement: Corners are often underutilized. A corner-mounted bike rack can tuck your bike away neatly.
- Hanging accessories: Use hooks or small shelves near your bike rack to store your cycling gear. This keeps everything in one place and off the floor.
Living in a small apartment doesn’t mean you have to sacrifice your love for cycling. With the right bike wall clip and a little creativity, you can easily create a functional and stylish storage solution that fits your space and lifestyle. It’s all about thinking outside the box and making the most of what you have!
Creative Ways To Use Bicycle Wall Clips
Vertical Storage Solutions
Okay, so you’ve got your bike clip, now what? Let’s talk about going vertical. This is the classic space-saving move, and it’s awesome for apartments where every inch counts. Think about it: your bike is usually longer than it is tall, so hanging it vertically instantly frees up floor space. Plus, it can look pretty cool, like a piece of modern art! You can even alternate the hanging direction to fit more bikes in the same space. Just make sure you can actually lift your bike that high!
Horizontal Display Options
Want to show off your sweet ride? Horizontal display is the way to go. It’s like giving your bike its own little stage. I’ve seen some people use this method to enhance their apartment’s aesthetics, turning their bikes into a focal point. It’s especially great if you have a bike with a cool design or a vintage frame. Just make sure you have enough wall space, because horizontal displays do take up more room than vertical ones.
Combining With Other Storage Solutions
Bike clips are cool, but they’re even cooler when they play nice with other storage stuff. Think shelves above your bike for helmets, gloves, and that lucky cycling cap. Or maybe a small cabinet underneath for tools and spare parts. It’s all about creating a bike-centric storage hub. I’ve seen people use pegboards next to their bikes for hanging gear – super efficient!
Choosing The Right Bicycle Wall Clip For Your Space
So, you’re ready to get that bike off the floor? Awesome! Picking the right bicycle wall clip might seem easy, but a little thought now can save you some trouble later. Let’s look at what you need to think about before you buy.
Consider Your Wall Type
First, what are your walls made of? This is super important! Drywall, concrete, brick – they all need different kinds of anchors. A clip that works great on a concrete wall might be totally useless on drywall. I learned this the hard way when I tried to hang a shelf once. Big mistake! Make sure the clip you choose is compatible with your wall type.
Assess Your Bike Size
Not all bikes are created equal, right? A tiny kids’ bike is way different than a heavy mountain bike. You need to make sure the clip you choose can handle the weight and size of your bike. Check the weight limit of the clip before you buy it. Also, think about the frame style. Some clips work better with certain frame shapes than others. I’ve seen some pretty funny fails when people try to hang a bike that’s way too big for the clip.
Think About Future Needs
What about the future? Will you get a new bike soon? Maybe a fancy e-bike that’s heavier than your current one? Or maybe your partner will want to store their bike too. Think about a clip that can handle different bike sizes or types. Planning ahead can save you from buying a new setup later.
Top Bicycle Wall Clip Brands To Explore
Okay, let’s get into some brands! Finding the right bicycle wall clip can feel like a real quest. There are tons of options, but some brands really shine. Let’s check out some top brands and what makes them special.
Innovative Designs
Some brands are really pushing the envelope with clever designs. Take Hornit Clug, for example; it’s so small and simple, you almost don’t see it! Then there’s Steadyrack, which lets you pivot your bike to the side, saving even more space. Gootus also has some cool horizontal options that look pretty stylish. These brands are all about making storage as easy and unobtrusive as possible.
Durability and Functionality
Of course, a cool design doesn’t mean much if the clip can’t hold your bike! That’s where brands like Feedback Sports come in. They’re known for making really solid, reliable racks that can handle all sorts of bikes. The Feedback Sports Velo Wall Rack is a popular choice. Durability is key, especially if you have a heavier bike or plan on using the clip a lot. You want something that will last for years, not something that will break after a few months.
User-Friendly Features
Ultimately, the best way to find a great brand is to see what other people are saying. User reviews can give you a real sense of how well a clip works in the real world. Do people find it easy to install? Does it scratch their bike frame? Does it actually save space? These are all important questions, and user reviews can help you find the answers. Don’t be afraid to do some digging and see what other cyclists recommend.
Reading reviews and forums can give you a good idea of which brands consistently deliver on their promises. It’s also a good way to spot any potential problems before you buy.
Maximizing Space With Bicycle Wall Clips
Utilizing Corners and Nooks
Alright, so you’ve got your bike clip, awesome! Now, let’s think strategically. Don’t just slap it on any random wall. Think about those underutilized corners and nooks. Seriously, that awkward corner behind the door? Perfect for a bike! That weird alcove in the hallway? Bike zone! The goal is to transform wasted space into a functional storage area. I found that one of the best ways to do this is to measure the bike’s dimensions and then see where it fits best without obstructing pathways or doors. It’s like a puzzle, but the prize is more space!
Creating a Bike-Friendly Environment
Let’s be real, bikes can be a bit…grimy. So, when setting up your bike storage, think about protecting your walls and floors. A simple mat under the bike can save your floor from tire marks and drips. Wall protectors are also a great idea, especially if you have delicate paint. Plus, consider ventilation. You don’t want moisture building up around your bike, especially after a rainy ride. I’ve even seen people use dehumidifiers in their storage areas. It might seem like overkill, but it keeps everything fresh and clean. Consider a compact bike rack for garage to keep your bike safe.
Incorporating Accessories
Bike clips are cool, but they’re even cooler when they play nice with other storage stuff. Think shelves above your bike for helmets, gloves, and that lucky cycling cap. Or maybe a small cabinet underneath for tools and spare parts. It’s all about creating a bike-centric storage hub. I’ve seen people use pegboards next to their bikes for hanging gear – super efficient! Here’s a few ideas:
- Shelves for helmets and gloves
- Pegboards for tools
- Small cabinets for spare parts
By integrating your bike storage with other organizational solutions, you create a cohesive and efficient space. It’s not just about storing your bike; it’s about creating a functional area that supports your cycling lifestyle.
Installation Tips For Your Bicycle Wall Clip
Finding the Perfect Spot
Okay, so you’ve got your bike rack wall hook ready to go. Now, where to put it? Think about how often you use your bike. Is it a daily commuter or a weekend warrior? Place it somewhere that’s convenient but doesn’t block walkways. Hallways and corners often work great. Also, consider the height. You want it high enough so you don’t bump your head, but low enough that lifting the bike isn’t a workout in itself. I usually aim for a height where the top of the tire is about at my shoulder level.
Tools You’ll Need
Alright, let’s talk tools. You’ll need a drill, no question about it. A cordless one makes life easier. A stud finder is essential – don’t even think about skipping this. A level is also a must, unless you want a crooked bike. Grab a measuring tape, a pencil, and the right drill bits for your wall type. Oh, and a screwdriver – both Phillips and flathead might be useful. Having a good toolkit makes the whole process way smoother. Trust me, you don’t want to be running to the hardware store mid-project.
Safety Precautions
Safety first, folks! Before you even think about drilling, put on some safety glasses. Seriously, protect those eyes. Make sure you’re not drilling into any electrical wires or plumbing – if you’re unsure, consult a professional. And, of course, always follow the manufacturer’s instructions for your specific wall clip. It’s also a good idea to have someone help you lift the bike onto the clip the first time, just to be safe. Better safe than sorry, right?
Maintaining Your Bicycle Wall Clip Setup
Alright, you’ve got your bike looking great on the wall, saving space and looking stylish. Don’t just leave it there! A little upkeep will keep everything safe and working well. Think of it this way: a little care now prevents big problems later. Plus, it’s a good excuse to give your bike some love too!
Regular Inspections
Make it a habit to check your bicycle wall clip setup regularly. I try to do a quick check about once a month. Here’s what I look for:
- Loose screws or bolts: These can loosen over time from vibrations. Tightening them can prevent bigger issues.
- Cracks or damage: Check the clip itself for any signs of wear. If you see something, it’s better to replace it sooner rather than later.
- Wall stability: Gently wiggle the clip. Make sure the wall anchors are still holding strong. If the wall feels soft or the anchors are loose, you might need to reinforce it.
Cleaning Tips
Keeping your setup clean not only looks better, but it also helps prevent corrosion and wear. Here’s what I do:
- Wipe down the clip: Use a damp cloth to wipe away any dust or grime. For tougher spots, a little mild soap can help.
- Check for rust: If you spot any rust, use a wire brush to remove it and then apply a rust-resistant coating.
- Clean the surrounding wall: Bike tires can leave marks on the wall. A magic eraser or a gentle cleaner can keep things looking fresh.
Turning your space into a bike-friendly zone isn’t just about storage; it’s about celebrating your love for cycling. It’s about making your bike feel at home, even when it’s not out on the road. And let’s be honest, a well-organized bike storage area just looks plain awesome.
Adjusting for Different Bikes
Got a new bike? Congrats! But before you hang it up, make sure your current setup is still a good fit. Here’s what to consider:
- Weight capacity: Double-check that your clip can handle the weight of your new bike. Overloading it is a recipe for disaster.
- Frame compatibility: Some clips are designed for specific frame types. Make sure your new bike’s frame fits properly in the clip.
- Adjust the position: You might need to adjust the height or angle of the clip to accommodate your new bike’s size and shape. Experiment a little to find the sweet spot.
Wrapping It Up: Your Bike’s New Best Friend
So, there you have it! The bicycle wall clip is a total game changer for anyone living in a tight space. It’s not just about getting your bike off the floor; it’s about making your home feel more organized and stylish. With so many options out there, you can find one that fits your vibe and your space perfectly. Plus, think about how much easier it’ll be to grab your bike and hit the road when it’s neatly stored on the wall. So go ahead, pick a wall clip that you love, and enjoy the freedom of cycling without the clutter!
Frequently Asked Questions
What should I consider when picking a bike wall clip?
Think about what your wall is made of, like wood or concrete, and how much space you have for your bike.
Can I use a bike wall clip for any type of bike?
Most bike wall clips can hold different types of bikes, but it’s best to check the weight limit.
How do I install a bike wall clip?
You’ll need to find the right spot on your wall, use the right tools, and follow the instructions that come with the clip.
Can I store other items with my bike on the wall?
Yes! Many wall clips have space for helmets or bags, or you can add shelves above or below.
How do I keep my bike wall clip in good shape?
Regularly check that it’s secure and clean it to prevent dirt from building up.
Are bike wall clips safe to use?
Yes, as long as they are installed correctly and you follow the weight limits.