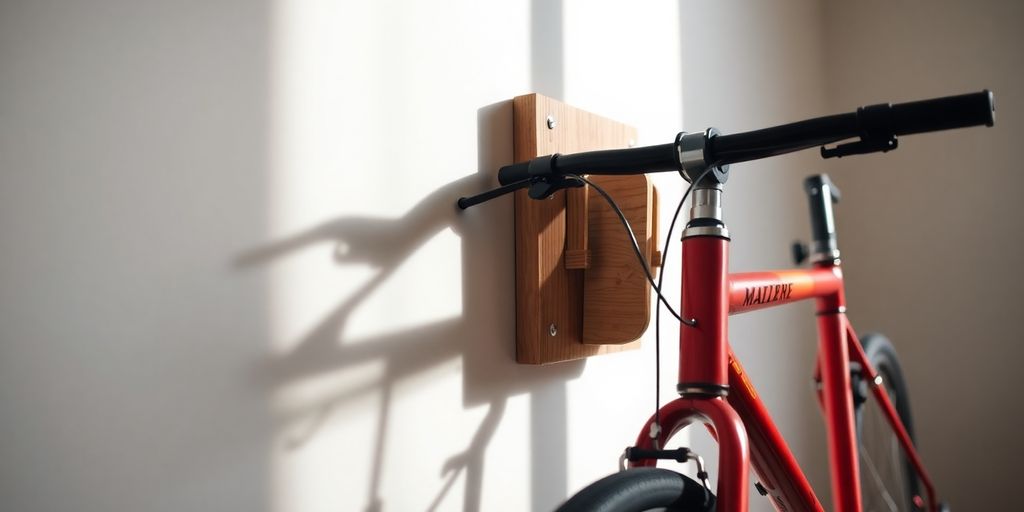
Got bikes? If you’re like me, they’re probably taking up way too much floor space in your garage or apartment. It’s a mess, right? Well, I’ve got a solution that’s not only super practical but also looks pretty good: a DIY wooden bike rack wall mount. This project is easier than you think, and it’ll help you get your space back while keeping your bike safe and sound.
Key Takeaways
- Building your own wooden bike rack wall mount saves floor space.
- A DIY wooden bike rack protects your bike from damage.
- You can add a custom, rustic look to your home with a wooden bike rack.
- Gathering the right tools and materials upfront makes the project go smoothly.
- Proper measurement and secure mounting are key for a safe and stable bike rack.
Why a Wooden Bike Rack Wall Mount is a Game-Changer
Gathering Your Go-To Gear for This Project
Designing Your Dream Wooden Bike Rack Wall Mount
Cutting and Shaping Your Wooden Components
Assembling Your Wooden Bike Rack Wall Mount
Alright, so you’ve got all your pieces cut and sanded, looking good! Now comes the fun part: putting it all together. This is where your vision really starts to take shape, and honestly, it’s super satisfying to see it come to life. Don’t rush it, take your time, and enjoy the process. You’re building something awesome for your bike, and that’s pretty cool.
Joining the Wooden Pieces
First things first, let’s get those wooden components connected. Depending on your design, you might be using wood glue, screws, or a combination of both. If you’re using glue, make sure you apply an even layer to both surfaces before pressing them together. Clamps are your best friend here; they’ll hold everything tight while the glue dries. If you’re screwing things together, pre-drilling pilot holes is a must. This prevents the wood from splitting, especially near the edges. A little patience now saves a lot of headaches later.
- Aligning pieces perfectly
- Applying wood glue evenly
- Using clamps for secure drying
- Pre-drilling pilot holes for screws
Attaching the Bike Hooks Securely
Now for the bike hooks! These are what will actually hold your bike, so getting them on there right is pretty important. Most bike hooks are designed to screw directly into wood. You’ll want to mark your spots carefully, making sure they’re spaced correctly for your bike’s frame. Again, pre-drilling is a good idea here. Screw them in until they’re snug, but don’t overtighten and strip the wood. You want them to feel solid, like they’re not going anywhere.
It’s a good idea to double-check your measurements for hook placement. A small error here can make your bike hang awkwardly, and nobody wants that after all this hard work.
Reinforcing for Maximum Strength
Even if your initial joints feel strong, adding some reinforcement is always a smart move, especially for something that’s going to hold weight. This could mean adding corner braces, extra screws in key areas, or even some metal plates if your design calls for it. Think about where the most stress will be when your bike is hanging and add support there. This step is all about making sure your rack is super sturdy and will last for years. For a space-saving rack, this extra reinforcement is key to its longevity and stability. You want to be confident that your bike is safe and sound up on the wall.
Mounting Your Masterpiece to the Wall
Alright, you’ve built this awesome bike rack, and now it’s time for the grand finale: getting it up on the wall! This part is super important because you want your bike to be safe and sound, not crashing down in the middle of the night. Don’t worry, it’s totally doable, and we’ll make sure it’s rock solid.
Finding the Right Spot
First things first, pick the perfect spot. Think about where your bike will live. Is it the garage, a spare room, or maybe even a cool display in your living area? Consider how much space you have and how easy it will be to get your bike on and off the rack. You want a spot that’s convenient and out of the way, but also somewhere you can show off your sweet ride and your DIY skills! Make sure there’s enough clearance for your bike’s handlebars and pedals so they don’t hit anything. Also, think about future bikes. If you plan on getting more, leave some room for expansion.
Securing to Wall Studs
This is where the real strength comes in. You absolutely, positively need to mount your bike rack into wall studs. Drywall alone just won’t cut it for holding up a bike. It’s like trying to hang a heavy picture on a thumbtack – it’s going to fall. Finding studs is pretty easy with a stud finder. Just slide it along the wall until it beeps or lights up. Mark the edges of the stud, then find the center. You’ll want to use long, sturdy screws, at least 2.5 to 3 inches, to go through your rack and deep into the stud. For extra security, use two screws per stud, one near the top and one near the bottom of your rack’s mounting points. This distributes the weight and makes it super stable. For more ideas on how to organize your space, check out these DIY bike storage solutions.
Testing for Stability and Safety
Once your rack is up, don’t just throw your bike on it and walk away. You’ve got to give it a good test. Gently pull down on the rack, wiggle it a bit, and make sure it doesn’t budge. You can even hang something heavy on it, like a backpack filled with books, for a few minutes to see how it holds up. Better safe than sorry, right? This quick check will give you peace of mind that your bike is secure and your hard work paid off. If it feels even a little bit wobbly, take it down and re-mount it, making sure those screws are firmly in the studs. You’ve put in the effort to build a great rack, so let’s make sure it’s mounted perfectly too!
Mounting your bike rack correctly is the final, crucial step to ensuring your bike is stored safely and your wall mount lasts for years. Take your time, measure twice, and don’t skip the stud-finding part. It’s worth the extra effort for a secure and reliable storage solution.
Finishing Touches for Your Wooden Bike Rack
Staining or Painting for Style
Alright, so you’ve got your bike rack all built and mounted, looking pretty good, right? But why stop there? This is where you get to really make it yours. Think about your space. Is it modern? Rustic? Industrial? A little stain or paint can totally transform the vibe of your wooden bike rack. If you’re into that natural wood look, a clear stain will just bring out the grain and give it a nice, warm glow. You can go light, dark, or even something with a hint of color. If you’re feeling bold, a pop of paint can add some serious personality. Maybe a bright color to match your bike, or something subtle to blend in with your wall. Just make sure to apply it evenly, and don’t rush the drying process between coats. You want it to look professional, not like a kindergartner’s art project.
Applying a Protective Sealant
Okay, so once your stain or paint is dry, you’re not quite done. This next step is super important, especially if your bike rack is going to be in a high-traffic area or somewhere it might get a little damp (like a garage). You need to apply a protective sealant. This isn’t just about making it look good; it’s about making it last. A good sealant will protect the wood from scratches, moisture, and even UV rays if it’s near a window. There are a bunch of options out there:
- Polyurethane: Super durable, comes in different sheens (matte, satin, gloss).
- Spar Varnish: Great for outdoor use, offers excellent UV and moisture protection.
- Lacquer: Dries fast, gives a hard, clear finish, but can be a bit tricky to apply.
Don’t skip this step! It’s like putting sunscreen on your skin; it protects your hard work from the elements and keeps it looking fresh for years to come. A little extra effort now saves a lot of headaches later.
Accessorizing Your New Rack
Now for the fun part: accessorizing! Your wooden bike rack isn’t just for holding your bike; it can be a whole storage hub. Think about what you usually grab when you’re heading out for a ride. Helmet? Gloves? Water bottle? You can add small hooks to the sides or bottom of your rack for these items. Maybe a little shelf for your bike computer or a small pump. You could even attach a small basket for keys or other bits and bobs. It’s all about making your life easier and keeping everything organized. Get creative with it! This is your chance to really customize your setup and make it work for you.
Wrapping It Up
So there you have it! Building your own wooden bike rack for the wall isn’t as hard as it might seem. It’s a fun weekend project, and honestly, it feels pretty good to make something useful with your own hands. Plus, now your bikes are all neat and tidy, off the floor, and out of the way. You’ve got more space, and your garage or living area looks way better. Give it a shot, you might surprise yourself with what you can build!
Frequently Asked Questions
What tools and materials do I need to build a wooden bike rack wall mount?
Building your own wooden bike rack for the wall is pretty easy! You’ll mainly need some basic tools like a drill, a saw, and a sander. For materials, grab some strong wood, like 2x4s, and don’t forget the special hooks for bikes. You’ll also need screws and other small bits to make it super strong.
How long does it take to build a DIY wooden bike rack?
The time it takes can change, but most people can get this done in a weekend. If you’re good with tools, it might be faster. If you’re new to this, take your time and follow the steps carefully. It’s better to do it right than rush!
How do I make sure the bike rack is strong enough to hold my bike?
Make sure your wall can handle the weight of your bike and the rack. You’ll want to find the wooden studs inside your wall to screw into. This makes sure your rack is super strong and won’t fall down. If you’re not sure, it’s always a good idea to ask for help or look up how to find studs.
Can I paint or stain my wooden bike rack to match my home decor?
Yes, you can! Before you put on the final protective coat, you can paint or stain the wood any color you like. This is a great way to make it fit in with your room or garage. Just make sure the paint or stain is dry before you add the sealant.
Is this project suitable for beginners?
This project is great for beginners! The steps are easy to follow, and you don’t need super fancy skills. Just be careful when using tools and always put safety first. There are lots of guides and videos online if you need extra help.
How do I maintain my wooden bike rack wall mount?
Keeping your wooden bike rack nice is easy. Just wipe it down now and then to keep it clean. If you used a protective seal, it should last a long time. If it starts to look dull after a few years, you can always put on another coat of sealant to make it look new again.