Are you tired of cluttered spaces and looking for a stylish way to store your bike? Creating your own DIY bicycle wall rack is a fun and practical project that can help you organize your space while showcasing your bike. In this guide, we will walk you through the steps to gather materials, build your rack, and even customize it to fit your style. Let’s get started!
Key Takeaways
- Gather essential tools like a drill, level, and measuring tape before starting.
- Choose sturdy bike hooks and ensure they are spaced correctly for easy access.
- Consider adding decorative elements to make your bike rack a stylish part of your home.
- Utilize vertical space effectively to maximize storage without taking up much room.
- Regularly check and maintain your bike rack to keep it safe and functional.
Gathering Your Materials
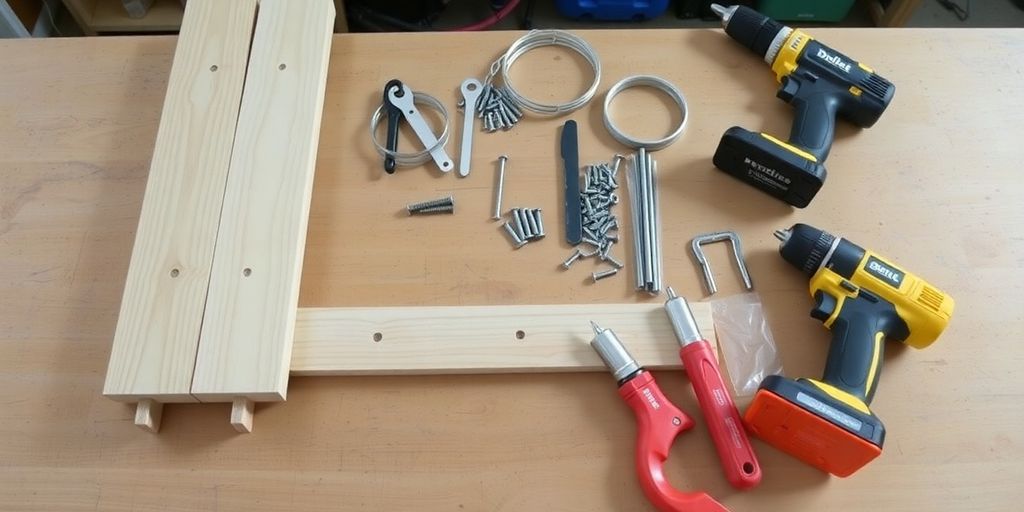
Before we dive into building your stylish bike rack, let’s gather everything you need. Here’s a quick list to get you started:
Essential Tools and Supplies
- 2×4 Lumber: Grab two 8-foot long 2x4s for the main structure.
- Bike Hooks: Choose sturdy hooks designed for bikes. I recommend ones that are affordable and built to last.
- Screws: You’ll need 3 ½-inch screws to mount the 2x4s to the wall studs and ⅜-inch screws for your bike hooks.
- Drill: A drill with a bit slightly smaller than your screws is essential for pre-drilling holes.
- Measuring Tape: Precision is key, my friends!
- Pencil: For marking your measurements.
- Level: To ensure your rack is mounted straight.
- Saw: You’ll need a saw to cut the 2x4s down to size.
Choosing the Right Bike Hooks
When selecting bike hooks, consider:
- Weight Capacity: Ensure they can hold your bike securely.
- Material: Look for durable materials that won’t bend or break.
- Design: Choose hooks that fit your style and space.
Preparing Your Workspace
- Clean Your Area: Clear a safe and spacious area where you can work comfortably.
- Gather Your Tools: Have everything within reach to make the process smoother.
- Check Your Wall: Make sure the wall you’re using can support the weight of your bike rack.
Remember, gathering your materials is the first step to a successful DIY project! With everything ready, you’ll be set to create a stylish and functional bike rack that fits your space perfectly!
Building Your DIY Bicycle Wall Rack
Now that you’ve gathered your materials, it’s time to get your hands dirty and start building! This part of the project is where the fun really begins. Let’s dive into the steps to create your very own bike rack!
Measuring and Cutting the Wood
- Clean Your Workspace: Make sure you have a clear area to work in. Safety first!
- Measure Your Wall Space: Decide where you want to install your rack. Allow about 12 inches for each bike, plus some extra space on the ends.
- Cut the 2x4s: Based on your measurements, cut your 8-foot 2x4s to the desired length. This will be the base of your rack.
Mounting the 2x4s
- Mark the Position: Use a level to mark where the lower 2×4 will go, about 65 inches from the ground.
- Pre-drill Holes: Drill holes into the wall studs for the screws. This ensures a strong hold.
- Secure the 2x4s: Attach the lower 2×4 first, then mount the upper one about 14 inches above it. Make sure everything is level!
Installing the Bike Hooks
- Space the Hooks: On the lower 2×4, mark where the bike hooks will go, spacing them about 24-26 inches apart.
- Pre-drill and Mount: Drill holes for the hooks and screw them in securely. Repeat this for the upper 2×4, centering the hooks between those on the lower one.
Building your own bike rack is not just practical; it’s a great way to express your creativity! With a little effort, you can create a stylish and functional storage solution for your bike.
By following these steps, you’ll have a sturdy bike rack that keeps your bikes organized and out of the way. Enjoy your new creation!
Creative Ideas for Customizing Your Rack
Painting and Staining the Wood
Adding a splash of color or a rich stain to your bike rack can really make it pop! Choose a color that matches your decor or go bold with a bright hue. Here are some tips:
- Use outdoor paint for durability.
- Consider a stain to highlight the wood grain.
- Test a small area first to see how it looks.
Adding Decorative Elements
Why not turn your bike rack into a piece of art? You can:
- Hang small plants or succulents on the rack.
- Use colorful hooks to add flair.
- Surround it with framed photos or artwork.
Incorporating Storage Solutions
Make your bike rack even more functional by adding storage! Here are some ideas:
- Install shelves above the rack for helmets and gear.
- Use baskets for small items like tools or snacks.
- Add hooks for hanging accessories like lights or locks.
Remember, your bike rack can be both stylish and practical! With a little creativity, you can create a unique storage solution that reflects your personality.
Highlight
- Customize it to face either direction using the detent pin, and tailor your bike storage experience!
Maximizing Space with Your Bicycle Wall Rack
When it comes to storing your bike, making the most of your space is key! Here are some great ways to do just that:
Utilizing Vertical Space
Maximizing vertical space is a smart way to keep your bike off the floor and free up room for other activities. Vertical bike racks allow you to store bikes high on the wall, making it easier to organize your space. You can even stagger multiple bikes to fit more in tight areas. Here’s why they’re great:
- Space-efficient: Perfect for smaller walls.
- Easy access: Each bike is simple to hang and remove.
- Versatile: Works with most wheel sizes.
Staggering Multiple Bikes
If you have more than one bike, consider staggering them on the wall. This method allows you to fit more bikes in a smaller area. Here’s how:
- Choose a wall: Find a sturdy wall that can support the weight.
- Install hooks: Use heavy-duty hooks to hang the bikes at different heights.
- Balance: Make sure each bike is secure and balanced to avoid accidents.
Using Corners and Tight Spaces
Don’t forget about those often-overlooked spaces! Corners and areas above doors can be perfect for bike storage. Here are some tips:
- Corner racks: Install a corner bike rack to utilize that space effectively.
- Above doors: Use hooks or shelves above doors to store bikes out of the way.
By thinking outside the box, you can create a functional and stylish space that showcases your love for cycling.
In summary, maximizing your vertical space with bike storage solutions not only keeps your bikes safe but also enhances your home’s organization. Get creative and enjoy your newly organized space!
Maintaining and Caring for Your Bike Rack
Keeping your bike rack in great shape is essential for both safety and longevity. Here’s how to ensure it stays functional and stylish!
Regular Inspections
Make it a habit to check your bike rack regularly. Look for any loose screws or signs of wear. A little attention can go a long way! Here are some key points to remember:
- Check for rust or damage, especially in humid areas.
- Ensure all screws are tight and secure.
- Look for any cracks or breaks in the rack itself.
Cleaning and Maintenance Tips
Dust and dirt can build up on your bike rack. Use a damp cloth to wipe it down and keep it clean. This helps ensure it works well and looks good. Here are some tips:
- Wipe down the rack with a damp cloth regularly.
- Use mild soap for tougher spots, if needed.
- Dry the rack thoroughly to avoid rust, especially if it’s metal.
Troubleshooting Common Issues
If you notice any problems, like a wobbly mount or difficulty hanging your bike, don’t panic! Here are some quick fixes:
- Tighten screws: Sometimes, just tightening the screws can solve the issue.
- Check the wall: Make sure the mount is securely attached to the wall. If it’s in drywall, consider using stronger anchors.
- Inspect for damage: Look for any cracks or breaks in the mount itself. If you find any, it might be time to replace it.
Keeping your bike rack well-maintained not only protects your bike but also enhances your home’s organization. Regular care can help you avoid bigger issues down the road!
Exploring Alternative DIY Bike Rack Designs
When it comes to bike storage, there are plenty of creative options to consider! Here are some fun alternatives that can help you keep your bike safe and stylish.
PVC Pipe Racks
Creating a bike rack from PVC pipes is a fun and cost-effective project. Here’s how to do it:
- Cut the pipes to your desired length.
- Connect them using the fittings.
- Secure the rack in a suitable spot.
This method is not only easy but also allows you to customize the rack to fit your space and the number of bikes you need to store.
Wooden Pallet Racks
Wooden pallets are versatile and can be transformed into bike racks easily. Just stand a pallet upright against a wall. The gaps between the slats are great for holding bike tires. You can even paint or stain it to match your decor. This is a fantastic way to recycle materials!
Repurposed Furniture Racks
Got old furniture lying around? You can turn it into a bike rack! For example, an old bookshelf can be modified by removing some shelves and adding hooks. This not only saves space but also adds a unique touch to your home.
DIY bike storage solutions are not just practical; they let you express your creativity! With a little effort, you can create a stylish and functional storage solution for your bike.
| Type of Rack | Materials Needed | Difficulty Level |
|---|---|---|
| PVC Pipe Racks | PVC pipes, connectors | Easy |
| Wooden Pallet Racks | Wooden pallets | Medium |
| Repurposed Furniture | Old furniture | Medium |
By trying out these DIY solutions, you can maximize your space while keeping your bike safe and secure! Remember, these are some of the best bike storage ideas that can help you find the perfect solution for your home!
Safety Tips for Installing and Using Your Bike Rack
Ensuring Proper Mounting
- Always double-check that the mount is securely attached to the wall. This is crucial for keeping your bike safe and preventing accidents.
- Use a stud finder to locate the wooden studs in your wall. This is where you’ll want to attach your mount for maximum support.
- Make sure to follow the manufacturer’s instructions carefully for a safe setup.
Balancing Your Bike
- Ensure your bike is balanced when hanging to avoid any accidents. A wobbly bike can lead to falls or damage.
- If you have multiple bikes, stagger their heights to keep them from bumping into each other.
- Consider using hooks that allow for easy access and balance.
Using the Right Tools
- Gather the right tools before starting your installation. You’ll need:
- Drill
- Level
- Stud finder
- Screwdriver
- Measuring tape
- Pencil
- Using the right tools makes the process smoother and safer.
Remember, a well-installed bike rack not only saves space but also keeps your bike safe and secure! Follow these steps, and you’ll be enjoying your new storage solution in no time.
Wrapping It Up: Your Stylish Bike Rack Awaits!
Creating your own bike wall rack is not just a fun project; it’s a great way to keep your space neat and stylish. With just a few tools and some creativity, you can build a rack that fits your bike and your home perfectly. Remember, it’s all about making the most of your space while showing off your love for biking. So grab your tools, follow the steps, and enjoy the satisfaction of a job well done. Your bike will thank you for it, and you’ll love how organized your space looks!
Frequently Asked Questions
What materials do I need to build a bicycle wall rack?
To create a bike wall rack, you’ll need 2×4 lumber, bike hooks, screws, a drill, a measuring tape, a level, and a saw.
How high should I mount my bike rack?
A good height for mounting your bike rack is about 5 to 6 feet from the ground, allowing easy access.
Can I install the bike rack myself?
Yes, you can install the bike rack on your own! Just follow the steps carefully and use the right tools.
What if I have multiple bikes?
If you have more than one bike, consider staggering them on the wall to save space and keep them organized.
How do I maintain my bike wall rack?
Regularly check for loose screws, clean off dust, and ensure the rack is secure to keep your bike safe.
Are there creative ways to customize my bike rack?
Absolutely! You can paint it, add decorative elements, or even incorporate shelves for extra storage.