Building your own DIY freestanding vertical bike rack can be a fun and rewarding project. Not only does it save space, but it also keeps your bikes organized and easily accessible. Whether you’re a seasoned DIY enthusiast or just looking to try something new, this guide will walk you through each step of the process. From gathering materials to putting the final touches on your rack, you’ll have a custom bike storage solution in no time.
Key Takeaways
- DIY bike racks save space and keep bikes organized.
- You can customize the rack to fit your space and style.
- Gather all necessary materials and tools before starting.
- Follow each step carefully for a sturdy and safe rack.
- Regular maintenance ensures the longevity of your bike rack.
Gathering Your Materials and Tools
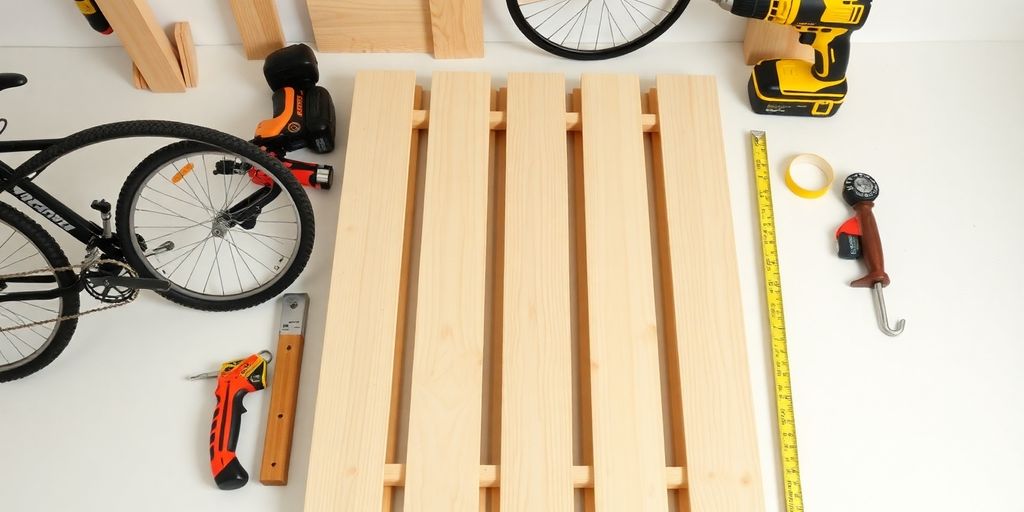
Alright, let’s get started on this fun project by gathering everything you’ll need. Building your own bike rack is a great way to save money and customize it to your space. First up, the materials.
Essential Materials for Your Bike Rack
You’ll need a few key items to bring your bike rack to life:
- 2×4 lumber: Grab three 8-foot long pieces. These will form the backbone of your rack. You might even have some leftover wood from previous projects.
- Pipe: A 1-1/4 inch diameter pipe works well. Aim for a 10-foot section. If you can find a used one, even better!
- Screws: Make sure you have plenty on hand. They’re the unsung heroes of any DIY project.
Pro Tip: If you’re looking to keep costs down, consider using untreated wood if your rack is staying indoors.
Tools You’ll Need for the Job
Having the right tools makes the job not only possible but enjoyable. Here’s what you’ll need:
- Saw: A hand saw will do, but a circular or miter saw will make life easier.
- Drill: Essential for assembling your rack.
- Measuring tape: Accuracy is key, and a good tape measure will ensure your cuts are spot on.
- Driver bits: Specifically for the screws you choose. Torx heads are a solid choice for this project.
- Hacksaw or pipe cutter: If you’re working with metal pipes, you’ll need something to cut them to size.
Where to Find Affordable Supplies
Now, where to get all this stuff without breaking the bank? Check out these options:
- Local hardware stores often have sales on lumber. Keep an eye out for discounts.
- Online marketplaces can be a goldmine for second-hand tools and materials.
- Don’t forget to ask friends or family if they have any spare materials lying around.
With these materials and tools in hand, you’re well on your way to creating a sturdy, functional bike rack. And remember, if you’re looking for detailed plans, consider checking out this wooden bike stand tutorial for more guidance. It’s a fantastic resource for anyone embarking on this DIY journey.
Designing Your Perfect Bike Rack
Choosing the Right Spot in Your Home
The first thing you gotta think about is where to put this bike rack. You want it somewhere convenient so you’re not lugging your bike across the house every time you wanna go for a ride. Look for a spot with enough space for easy access, like a garage or a spacious hallway. Make sure there’s enough room not just for the rack, but for you to move around it comfortably. You don’t want to be squeezing past your bikes every day.
Deciding on the Rack Dimensions
Once you’ve picked the spot, it’s time to figure out how big this rack needs to be. Consider the number of bikes you have now and if you might add more in the future. A good rule of thumb is to allow about 16 inches of space per bike. This gives you enough room to store them without them bumping into each other. If you’re planning on storing bikes with different frame sizes, like kids’ bikes and adult bikes, make sure to adjust the height accordingly.
Sketching Your Design Plan
Before you start cutting wood or buying materials, sketch out a plan. This doesn’t have to be a masterpiece—just something to give you a clear idea of what you’re building. Use a pencil and paper, or even a digital tool if you’re tech-savvy. A simple drawing will help you visualize the project and ensure you have all the necessary materials before you start.
A little planning goes a long way in DIY projects. Taking the time to design your bike rack can save you from headaches and extra trips to the hardware store later on.
If you’re looking for detailed DIY plans complete with a shopping list and visual aids, there are plenty of resources available to guide you through the process. Just make sure whatever plan you choose fits your space and style.
Building the Base of Your Bike Rack
Alright, let’s get started on the foundation of your bike rack. This is where things start to take shape, literally!
Cutting and Preparing the Wood
First things first, grab your trusty saw and cut the wood to your desired dimensions. You’ll need a couple of 2x4s, and maybe a 2×6 if you’re feeling fancy. Make sure your cuts are clean and precise, so everything fits together nicely later. It’s a good idea to sand down the edges a bit, just so you don’t end up with splinters. If you’re unsure about dimensions, check out some detailed woodworking plans for guidance.
Assembling the Base Structure
Now that you’ve got your pieces all cut, it’s time to put them together. Think of it like building a puzzle, but you get to decide what the final picture looks like! Use some 3-inch screws to secure your pieces. A drill will make this step a breeze, but a screwdriver and some elbow grease will work in a pinch. Ensure everything is squared up using a speed square. This is where your rack starts to look like something real.
Ensuring Stability and Balance
Stability is key! You don’t want your bike rack tipping over at the slightest breeze. To make sure everything stays upright, consider adding some diagonal braces. These little guys will help keep your rack stable and prevent any unwanted wobbles. If you’re parking this rack on an uneven surface, you might want to add adjustable feet or even a bit of extra weight at the base. Remember, a stable base is the foundation of a great bike rack!
Building the base might seem daunting at first, but once you see it coming together, you’ll feel like a true DIY master. Just take it step by step, and don’t rush. Your future self will thank you for the attention to detail!
Adding Vertical Supports
Measuring and Cutting Vertical Pieces
First things first, you need to measure the space where your vertical supports will go. Grab your tape measure and note the height from the floor to where you want the top of your bike rack. This will help you figure out the length of your vertical pieces. Make sure to account for the bike’s height too! Once you’ve got your measurements, it’s time to cut the wood. Use a miter saw to cut the wood at a 90-degree angle, ensuring a snug fit when assembling. If you’re feeling adventurous, you could also add a diagonal cut for extra flair.
Attaching the Supports Securely
Now, let’s put those vertical pieces in place. Line them up with the base you’ve already built. Use a level to make sure everything’s straight—trust me, you don’t want a wonky bike rack! Secure each piece with 3-inch screws. Pre-drilling the holes can prevent the wood from splitting, which is always a plus. If you’re going for a lockable bike stand with wheels, make sure to leave some room for the locking mechanism.
Tips for Extra Stability
Alright, let’s talk stability. Nobody wants their bike rack to topple over! Consider adding diagonal braces to the structure. These braces, cut at a 45-degree angle, can be attached to the back of the vertical supports and the base. They’ll help keep everything steady and secure. Another tip is to ensure the bottom of the rack is wide enough to support the weight of the bikes without tipping. A wider base can make a huge difference in stability.
Building a bike rack is all about combining functionality with a bit of creativity. Once those vertical supports are in place, you’ll see your project really start to take shape. Keep it steady, and you’re halfway to a sleek, space-saving bike rack!
Finishing Touches and Customization
Sanding and Smoothing the Surfaces
Before you wrap up your project, take a moment to sand down all the surfaces of your bike rack. This step is crucial for getting rid of any rough edges or splinters. Use a fine-grit sandpaper for a smooth finish. Sanding not only enhances the look but also ensures the safety of your hands and your bike.
Painting or Staining Your Rack
Now, let’s add some color or a nice finish to your bike rack. You can choose to paint it in a color that matches your home decor or go for a classic wood stain to highlight the natural grain. Remember to apply a primer first if you’re painting, and let each coat dry completely before adding another. This will help your bike rack withstand the test of time.
Adding Hooks and Accessories
Finally, consider adding some hooks or other accessories to make your bike rack even more functional. This could include hooks for helmets, gloves, or even a small shelf for your water bottle. Customizing your rack with these additions not only makes it more practical but also gives it a personal touch.
With these finishing touches, your DIY bike rack will not only be a practical storage solution but also a stylish addition to your home. It’s amazing how a bit of creativity and effort can transform your space into something truly unique.
Safety Tips and Maintenance
Regular Checks for Wear and Tear
Keeping an eye on your bike rack is key to making sure it stays in good shape. Inspect it regularly for any signs of wear and tear. Look out for loose screws, cracked wood, or any other damage. If you spot something, fix it right away to avoid bigger problems later. A quick check every month should do the trick.
Ensuring Safe Bike Placement
When you’re placing your bike on the rack, make sure it’s stable and secure. Double-check that the tires are resting evenly and the frame is balanced. If your bike wobbles, it might be time to adjust the supports or add some padding. Consider using a DIY bike repair stand for extra support when you’re working on your bike.
Maintaining the Rack Over Time
To keep your bike rack looking good and working well, a little maintenance goes a long way. Oil the hinges if they start to squeak, and give any metal parts a wipe down to prevent rust. If you’ve painted or stained your rack, touch up any chips or scratches to keep it looking fresh. Every once in a while, tighten up any loose screws or bolts to keep everything snug.
A well-maintained bike rack not only keeps your bikes safe but also adds a touch of organization to your space. Plus, it’s a great feeling to know you built something that’s both useful and durable.
Showcasing Your New Bike Rack
Organizing Your Bikes Efficiently
Congratulations! You’ve built your own DIY freestanding vertical bike rack. Now, it’s time to make the most of it by organizing your bikes efficiently. Start by deciding which bikes are used most frequently and position them for easy access. This way, you won’t have to shuffle things around every time you want to ride. If you’ve got kids, place their bikes lower or in spots they can easily reach. Consider adding small labels or tags to each spot, so everyone knows where their bike belongs.
Making the Most of Your Space
Your new bike rack isn’t just about holding bikes; it’s about maximizing your space. Think about the area around your rack. Could you add a small shelf for helmets or a basket for gloves and locks? Maybe there’s room for a narrow bench to help with putting on shoes or adjusting gear. By creatively using the space, you’ll keep your garage or room tidy and functional. For those looking for more ideas, explore modern bike rack options that combine style and practicality.
Inviting Friends to See Your Creation
You’ve put a lot of effort into building this bike rack, and it’s worth showing off! Invite some friends over to see your handiwork. It might even spark some DIY inspiration in them. Plus, having a dedicated space for your bikes can lead to some great conversations about cycling adventures and future rides. Who knows, your DIY project might just become the talk of your next get-together!
Building something with your own hands is incredibly satisfying. Not only have you solved a storage problem, but you’ve also created a piece that reflects your style and needs. Enjoy the fruits of your labor!
Wrapping It Up
So there you have it, your very own DIY freestanding vertical bike rack! Not only have you saved some bucks, but you’ve also created a nifty spot to keep your bikes organized. It’s pretty satisfying to see all those bikes lined up neatly, isn’t it? Plus, you can tweak the design to fit your space and style. Whether you’re a seasoned DIYer or just starting out, this project is a great way to get your hands dirty and make something useful. So go ahead, give yourself a pat on the back, and maybe even take one of those bikes for a celebratory spin. Happy building!
Frequently Asked Questions
What materials do I need to build a bike rack?
To make a bike rack, you’ll need some 2×4 and 2×6 wooden boards, deck screws, sandpaper, and bike hooks.
What tools are necessary for this project?
You’ll need a circular saw, cordless drill, tape measure, and a straight edge. A hand saw and screwdriver can be used instead if needed.
How do I ensure my bike rack is stable?
Make sure to assemble the base structure carefully and check for balance. You can add extra support if needed.
Can I customize the bike rack to fit my space?
Yes, you can adjust the dimensions and design to fit your available space and the number of bikes you have.
Is it possible to add hooks for helmets and accessories?
Yes, you can add hooks to store helmets, locks, and other bike accessories on your rack.
How do I maintain my bike rack over time?
Regularly check for wear and tear, ensure the screws are tight, and make sure the rack remains stable.