Ever thought about making your own bike rack? It might sound tricky, but trust me, it’s not as hard as it seems. Plus, building a DIY bike rack wall mount is a great way to keep your bike safe and your space tidy. Whether you’re an experienced DIYer or just starting out, this guide will walk you through creating a stylish and functional bike rack that’ll make your bike storage a breeze.
Key Takeaways
- Building your own bike rack is cost-effective and satisfying.
- A DIY bike rack helps keep your space organized and clutter-free.
- You can customize your bike rack to fit your style and needs.
- Using sustainable materials can make your project eco-friendly.
- Proper installation is key for safety and durability.
Why Choose a DIY Bike Rack Wall Mount?
Benefits of a Wall-Mounted Bike Rack
A wall-mounted bike rack is a fantastic way to keep your bikes organized and off the floor. It frees up valuable space, making your garage or apartment look neat and tidy. Plus, it keeps your bikes safe from accidental damage. You won’t have to worry about tripping over them or having them fall over. With a wall-mounted rack, everything is in its place, which can be a real lifesaver in small spaces.
Cost-Effectiveness of DIY Solutions
Building your own bike rack can save you a ton of money compared to buying a pre-made one. Most of the materials needed are affordable and easy to find at your local hardware store. Not only do you save cash, but you also get to customize the rack to fit your specific needs and style. Why spend extra on something generic when you can create something personal and unique?
Personal Satisfaction of Building Your Own
There’s something incredibly rewarding about making something with your own hands. When you build your own bike rack, you get to enjoy the pride of seeing your hard work come to life. It’s not just about the end product; it’s about the process. You’ll learn new skills, maybe make a few mistakes along the way, but in the end, you’ll have something that’s truly yours. And let’s be honest, showing off your DIY skills to friends and family is pretty cool too!
Embracing a DIY project like this not only enhances your living space but also gives you a sense of accomplishment that store-bought solutions just can’t match. It’s your design, your effort, and your victory.
Gathering Your Materials for the Perfect Bike Rack
Essential Tools and Supplies
Alright, let’s get down to the nuts and bolts of this project. Gathering the right materials is half the battle won when it comes to building your own bike rack. Here’s a simple list to get you started:
- 2×4 Lumber: You’ll need a couple of 8-foot long pieces. These will form the backbone of your rack.
- Bike Hooks: Make sure they’re sturdy enough to hold the weight of your bike. Look for hooks specifically designed for bikes.
- Screws: Grab some 3 ½-inch screws for mounting the 2x4s and appropriate ones for the bike hooks.
- Drill: A reliable drill is your best friend here. Don’t forget a drill bit that’s slightly smaller than your screws for pre-drilling.
- Measuring Tape: Precision is key, folks!
- Pencil and Level: For marking and ensuring everything is straight.
- Saw: A saw to cut the lumber down to size.
Choosing the Right Hooks and Fittings
Picking the right hooks and fittings can make a world of difference. You want something that’s not just functional but also complements your style. Go for hooks that are not only strong but also have a bit of flair. Some folks even choose decorative hooks to add a little pizzazz.
Sustainable Material Options
If you’re into being eco-friendly, consider using reclaimed wood or recycled materials for your project. Not only does this help the planet, but it also gives your bike rack a unique character. Imagine a rack that tells a story every time you hang your bike! Reclaimed wood can be a bit tricky to work with, but the results are often worth the effort. Just be sure to treat it to avoid any unwanted critters tagging along.
Step-by-Step Guide to Building Your DIY Bike Rack
Preparing Your Workspace
Before diving into the build, make sure you have a clean and organized workspace. Clear out any clutter and ensure you have enough room to move around. This might seem like a small step, but trust me, it makes a huge difference. A tidy workspace leads to a tidy mind! Grab all your tools and materials and lay them out so you can easily see and reach everything.
Cutting and Assembling the Frame
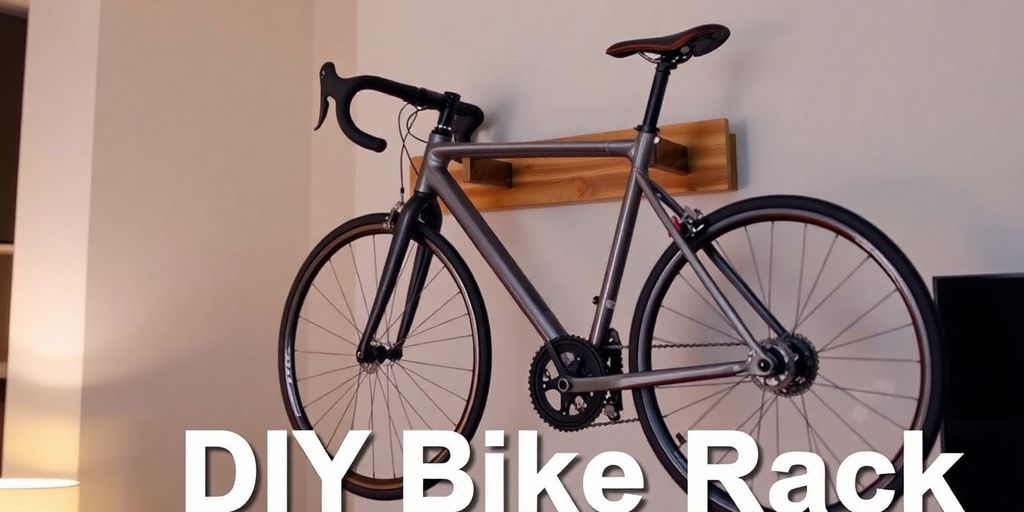
Now, let’s get to the fun part! Start by measuring your wall space. You’ll need two 8-foot long 2x4s, so grab your tape measure and pencil. Mark out where you need to cut and use your saw to cut the 2x4s to the correct length. Once cut, position the lower 2×4 about 65 inches from the ground and the upper one 14 inches above that. Use a level to ensure everything is straight. Pre-drill holes into the wall studs and secure the 2x4s with screws. This step is crucial for stability, so take your time.
Installing the Bike Hooks
With the frame in place, it’s time to add the bike hooks. On the lower 2×4, mark where each hook will go, spacing them about 24-26 inches apart. Pre-drill holes and screw in the hooks. Repeat this process for the upper 2×4, centering the hooks between those on the lower board. This setup will give you enough space to hang multiple bikes without them getting tangled up.
Building your own bike rack isn’t just about saving money or creating a storage solution. It’s about the satisfaction of making something with your own hands. Plus, you get to customize it exactly how you want.
Once everything’s in place, step back and admire your handiwork. You’ve just built a functional and stylish bike rack! If you want to take it up a notch, consider adding a wooden shelf above the rack for extra storage. Now, your bikes have a home, and your space looks fantastic.
Adding Personal Touches to Your Bike Rack
Incorporating a Wooden Shelf
Adding a wooden shelf to your bike rack not only enhances its functionality but also gives it a touch of elegance. Imagine having a spot for your water bottle, keys, or even your helmet right above your bike. It’s simple: just screw a board above or below the bike cradle. Make sure the shelf is secure by using end caps to hold it in place. This way, you can keep all your biking essentials in one convenient spot.
Using Recycled Materials for a Unique Look
Want to make your bike rack stand out? Try using recycled materials. Old bike tubes can be wrapped around the cradles to protect your bike’s frame. Not only does this add a layer of protection, but it also gives your rack a cool, industrial vibe. Plus, it’s a great way to recycle materials you might already have lying around.
Customizing with Paint or Stain
Give your bike rack a personal touch with paint or stain. Choose colors that match your bike or the decor of your garage. Softwoods like pine absorb stains quickly, so consider using a pre-stain conditioner to avoid blotchy finishes. Whether you go for a bright color or a more natural wood finish, this step allows you to express your style and make the rack uniquely yours.
A touch of creativity can transform a simple bike rack into a statement piece that reflects your personality. Embrace the opportunity to make it your own, and enjoy the satisfaction of a project well done.
For more creative ideas, check out these DIY bike storage solutions that cater to various needs and spaces. You’ll find inspiration to make your bike organization both stylish and practical.
Tips for a Safe and Secure Installation
Ensuring Proper Wall Stud Placement
When you’re setting up your DIY bike rack, finding the wall studs is like finding the hidden treasure. Seriously, it can make or break your project. Use a quality stud finder to locate them. Once you’ve found the studs, mark their locations clearly. This ensures that your bike rack has the support it needs. Remember, the rack’s strength is only as good as the wall it’s mounted on. So, don’t skip this step!
Selecting the Right Drill and Screws
Choosing the right drill and screws might seem like a minor detail, but it’s super important. Opt for a drill that feels comfortable in your hands. You’ll need screws that can handle the weight of your bikes. Typically, 3 ½-inch screws work well for securing the frame to the wall. For the bike hooks, you might need something different, like ⅜-inch screws. Always pre-drill your holes to prevent the wood from splitting.
Safety Gear and Precautions
Safety first, folks! Whenever you’re working with power tools, make sure to wear safety glasses to protect your eyes. Gloves can also save your hands from splinters and blisters. And, if you’re working in a dusty area, consider wearing a mask.
Safety isn’t just about gear; it’s about mindset. Take your time, don’t rush, and double-check your setup before drilling or cutting. After all, it’s better to be safe than sorry.
By following these tips, you’ll have a secure and safe bike rack that not only looks great but also stands the test of time. If you’re looking for more ways to organize your garage, consider exploring other storage solutions that fit your space and style.
Maximizing Space with Your DIY Bike Rack
Organizing Your Garage or Apartment
Creating a DIY bike rack isn’t just about having a spot for your bike; it’s about making smart use of your space. Imagine having a clutter-free garage or apartment! Start by assessing the area where you plan to install the rack. Think vertically—use the height of your walls to keep the floor clear. This not only saves space but also makes your living area look tidy and organized. Consider installing shelves above your bike rack for helmets, gloves, and other gear.
Combining Bike Storage with Other Uses
Why stop at storing your bike? With a little creativity, your bike rack can serve multiple purposes. Incorporate hooks for hanging jackets or bags, or add a small shelf for your keys and wallet. You could even create a DIY folding bike rack that swings flat against the wall when not in use, making it a perfect solution for tight spaces. This multifunctional approach not only saves space but also keeps your essentials in one convenient spot.
Creative Layout Ideas for Small Spaces
Living in a small apartment? No problem! A bit of creativity can turn even the tiniest nook into a functional bike storage area. Use corner spaces or the back of doors for mounting bike hooks. Opt for a vertical bike rack that allows bikes to be stored upright, freeing up floor space. For a sleek look, choose racks that blend with your interior design, like those made from wood or metal. Remember, the goal is to make your bike storage as unobtrusive and stylish as possible.
Transforming your living space with a DIY bike rack is more than just practical—it’s a chance to get creative and make your home uniquely yours.
Show Off Your DIY Bike Rack Creation
Sharing Your Project on Social Media
You’ve put in the work, and now it’s time to let the world see your awesome DIY bike rack. Social media is the perfect platform to showcase your creativity. Snap some photos of your stunning bike storage solutions, and don’t forget to capture those unique angles that highlight the design. Post your masterpiece on Instagram, Facebook, or Twitter, and watch the likes and comments roll in. Use popular hashtags like #DIYBikeRack, #BikeStorage, and #HomeImprovement to reach a wider audience. Who knows, your project might just inspire someone else to take on their own DIY adventure!
Inspiring Others with Your Design
Your DIY bike rack isn’t just a functional piece; it’s a statement. By sharing your design, you can inspire others to think outside the box and create their own unique storage solutions. Consider writing a brief post or blog entry about your experience. Include the challenges you faced and how you overcame them, as well as any tips you might have for fellow DIY enthusiasts. This not only helps others but also builds a sense of community among like-minded individuals.
Joining DIY Communities for More Ideas
Getting involved with DIY communities can be a game-changer for your future projects. These groups are full of people who share your passion for creating and can offer valuable advice and feedback. Join forums, Facebook groups, or local meetups where you can exchange ideas and learn from others’ experiences. Being part of a community keeps you motivated and opens up new possibilities for your next project. Plus, it’s a great way to make friends who appreciate your love for DIY just as much as you do.
Building something with your own hands is incredibly rewarding. Sharing it with others not only spreads joy but also encourages creativity and innovation in ways you might never have imagined.
Wrapping It Up
So there you have it, folks! You’ve just crafted your very own DIY bike rack wall mount. Not only does it look great, but it also keeps your bikes organized and off the floor. Who knew a few pieces of wood and some hooks could make such a difference? Now, every time you walk into your garage, you’ll feel that sense of accomplishment. Plus, your bikes are ready to roll whenever you are. If you enjoyed this project, why not share your experience or even a photo of your masterpiece? We’d love to see how it turned out. And hey, if you’re itching for more DIY adventures, stick around. There’s always something new to create and explore!
Frequently Asked Questions
Why should I make my own bike rack?
Building your own bike rack is a fun project that saves money and gives you a sense of achievement. Plus, you can customize it to fit your space and style.
What materials do I need for a DIY bike rack?
You’ll need 2×4 lumber, bike hooks, screws, a drill, measuring tape, a pencil, a level, and a saw. You can also add a shelf or other features.
How do I make sure my bike rack is safe?
To keep your bike rack safe, mount it into wall studs, use strong hooks, and wear safety gear like goggles when using tools.
Can I add a shelf to my bike rack?
Yes, you can add a wooden shelf to hold bike accessories like helmets and water bottles. Just make sure it’s secure.
How far apart should I space the bike hooks?
Place the bike hooks about 24-26 inches apart. This gives enough room to hang and remove bikes easily.
What if I don’t want to drill into my wall?
If you can’t drill into your wall, consider using a freestanding bike rack or a ceiling-to-floor pole that doesn’t need permanent installation.