If your garage has turned into a chaotic mess of tools, bikes, and who knows what else, it might be time to reclaim your space. Building your own stylish DIY wood bike storage can not only tidy up your garage but also add a personal touch to your home. With a little creativity and some basic tools, you can create a bike rack that looks good and keeps your bikes safe and organized. Let’s dive into how you can craft your own bike storage solution that fits your style and needs!
Key Takeaways
- Choosing the right wood is important for both aesthetics and durability.
- Think about using eco-friendly materials to make your project sustainable.
- Design your bike rack to maximize space and fit your specific needs.
- Add personal touches with paint, stain, or recycled materials for a unique look.
- Regular maintenance will keep your DIY wood bike storage in great shape for years.
Choosing The Right Materials For Your DIY Bike Storage
Alright, so you’re ready to build your own bike rack! Awesome! But before you start swinging that hammer, let’s talk about the foundation of any good DIY project: the materials. Picking the right wood (or wood alternative) can make or break your project, so let’s get it right.
Selecting Quality Wood
Okay, wood selection time! Not all wood is created equal, especially when it comes to supporting the weight of your precious bikes. For a sturdy rack, you’ll want to consider hardwoods like oak, maple, or even ash. These are tougher and less likely to warp or split under pressure. Softwoods like pine are cheaper, sure, but they might not hold up as well over time, especially if you’ve got heavier bikes. Check for knots and imperfections – fewer knots mean a stronger, more reliable piece of wood. Also, think about the finish you want. Some woods take stain better than others, so do a little research before you commit. You can also create lightweight front and rear platform bike racks using alternative materials.
Eco-Friendly Options
Want to keep your project green? Me too! There are some fantastic eco-friendly options out there for your bike rack. Consider using reclaimed wood – it’s got character, it’s sustainable, and it gives old wood a new life. Bamboo is another great choice; it’s super strong, grows quickly, and looks pretty stylish. Just make sure it’s properly treated for outdoor use if your rack is going in the garage. Look for FSC-certified wood to ensure it comes from responsibly managed forests. Every little bit helps, right?
Durability Considerations
Let’s face it, your bike rack is going to take a beating. Bikes get leaned, bumped, and sometimes even dropped (oops!). So, durability is key. Think about where your rack will live. Is it indoors, safe from the elements? Or will it be braving the garage humidity and temperature swings? For outdoor racks, you’ll definitely want to choose weather-resistant wood like cedar or redwood. Even for indoor racks, a good sealant or finish is a must to protect against moisture and wear. Nobody wants a saggy, wobbly bike rack after just a few months, so plan ahead!
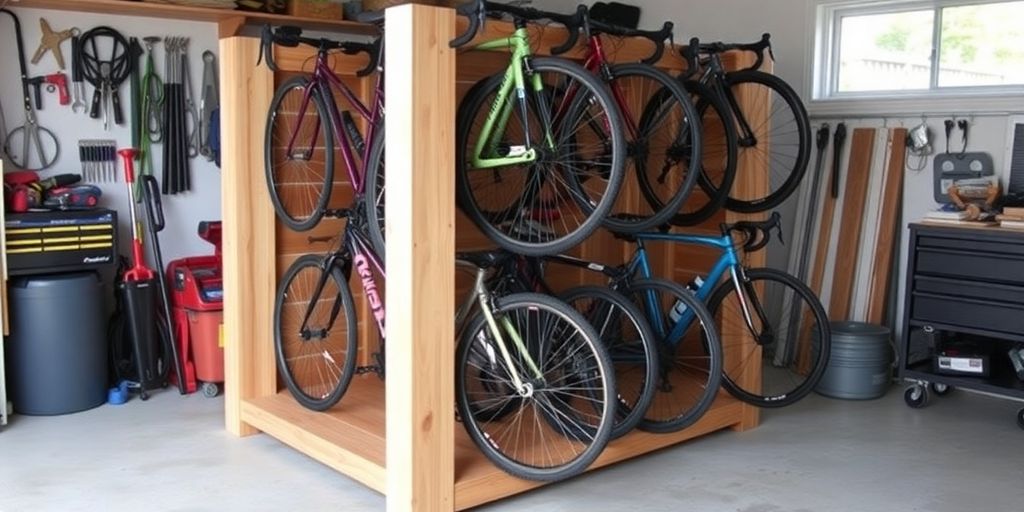
Designing Your Stylish Bike Rack
Alright, so you’ve got your materials, and you’re ready to build. Now comes the fun part: figuring out how to make this bike rack actually look good! It’s not just about function; it’s about form, baby! Let’s dive into making a bike rack that’s both practical and a stylish addition to your garage or living space.
Incorporating Aesthetic Elements
Think about what style you’re going for. Are you into a rustic, reclaimed wood look? Or maybe something sleek and modern with clean lines? Consider the overall aesthetic of your space and how the bike rack can complement it. I saw this one rack online that used old pipes – super cool industrial vibe! You could also play with different wood finishes, stains, or even paint to match your existing decor. Don’t be afraid to get creative and add some personal flair!
Maximizing Space Efficiency
Okay, let’s be real, space is usually at a premium. So, how can we make this bike rack as space-saving as possible? Vertical storage is your best friend here. Think about mounting the rack higher up on the wall to free up floor space.
Here are a few ideas:
- Vertical Wall Mount: Bikes hang vertically, taking up minimal floor space.
- Ceiling Mount: Bikes are hoisted up to the ceiling, completely out of the way.
- Corner Rack: Utilizes often-unused corner space.
Also, consider how many bikes you need to store. Design the rack to fit your specific needs, without taking up unnecessary room. A well-designed rack can actually make your garage feel bigger and more organized. Who knew, right?
Customizing For Your Needs
This is where the DIY magic really happens! Think about what specific needs you have. Do you need extra storage for helmets, bike locks, or other gear? Consider adding shelves or hooks to your design. Maybe you want a built-in repair stand? The possibilities are endless! The best part about building your own bike rack is that you can tailor it to perfectly fit your lifestyle. I’m thinking of adding a small shelf to mine for my bike pump and a little basket for my gloves. It’s all about making it work for you!
Step-By-Step Guide To Building Your Bike Rack
Gathering Your Tools
Okay, let’s get started! First things first, you’ll need to gather all your tools and materials. It’s way easier to have everything ready before you start. Trust me, you don’t want to be running to the hardware store mid-project. Having the right tools makes all the difference. Here’s a quick checklist:
- Wood (2x4s are a good start)
- Screws (make sure they’re the right size for your wood)
- Drill (with various drill bits)
- Saw (circular saw or hand saw, whatever you’re comfortable with)
- Measuring tape
- Pencil
- Level
- Sandpaper
- Bike hooks or cradles
Having all your materials prepped and ready to go will save you a ton of time and frustration. Plus, it’s a great excuse to organize your workspace a little!
Measuring And Cutting Wood
Alright, time to get cutting! Measure twice, cut once – that’s the golden rule, folks. Decide on the dimensions of your rack based on the space you have and the number of bikes you want to store. I usually sketch out a quick plan on paper first. It doesn’t have to be perfect, just something to guide you. For a basic wall-mounted rack, you’ll probably need:
- Two long pieces for the top and bottom supports
- Several shorter pieces for the vertical supports
- Possibly some angled pieces for extra stability
Make sure all your cuts are straight and clean. A little sanding can smooth out any rough edges. This is where those essential tools come in handy!
Assembling The Rack
Now for the fun part – putting it all together! Start by attaching the vertical supports to the top and bottom pieces. Use your drill and screws to create a sturdy frame. Make sure everything is level and square. If you’re adding angled supports, now’s the time to attach them. Once the frame is solid, you can install the bike hooks or cradles. Space them out evenly, making sure there’s enough room for each bike. I like to pre-drill pilot holes for the hooks to prevent the wood from splitting. And that’s it! You’ve got yourself a functional bike rack. Now you can add a wooden shelf for extra storage.
Creative Storage Solutions For Small Spaces
Okay, so you’re working with limited space? No sweat! That just means we need to get a little creative with our bike storage. It’s all about maximizing what you’ve got and thinking outside the box. Let’s dive into some ideas that’ll help you keep your bike safe and sound without sacrificing precious square footage.
Utilizing Vertical Space
Seriously, look up! Walls are your best friend when space is tight. Vertical bike racks are a game-changer, allowing you to store your bike upright and free up floor space. You can find racks that hang your bike by the front wheel, or even systems that lift your bike closer to the ceiling. Plus, think about adding shelves above the bike rack for your helmet, gloves, and other cycling gear. It’s all about making the most of every inch!
Multi-Functional Designs
Why have just a bike rack when you can have more? Consider designs that serve multiple purposes. A bench with built-in bike storage? Yes, please! Or how about a decorative screen that also doubles as a bike rack? The possibilities are endless. Think about what else you need in your garage or apartment and see if you can combine it with your bike storage solution. It’s a win-win!
Hiding Your Bike Rack
Sometimes, you just don’t want to see your bike all the time. I get it. That’s where hiding your bike rack comes in. Think about using a curtain or screen to conceal your bike storage area. Or, if you’re feeling ambitious, you could build a small closet or cabinet to house your bike. The goal is to keep your bike out of sight when it’s not in use, so it doesn’t clutter up your living space.
Transforming your garage with a DIY bike rack is more than just practical—it’s a chance to get creative and make your home uniquely yours. Don’t be afraid to experiment and try new things. The most important thing is to find a solution that works for you and your space.
Adding Personal Touches To Your Bike Storage
Okay, so you’ve built your bike rack – awesome! But now’s the time to really make it yours. Let’s move beyond just functional and inject some personality into that wood. It’s all about making your garage (or wherever this rack ends up) a little more ‘you’.
Painting And Staining Ideas
Alright, let’s talk color! This is where you can really let your creativity shine. Think about matching your bike’s color scheme, or maybe going bold with a bright accent color that pops in your garage. Staining is another great option, especially if you want to highlight the natural wood grain. I’ve found that using a pre-stain conditioner on softer woods like pine really helps avoid those blotchy finishes. Don’t be afraid to experiment – it’s just paint (or stain!).
Using Recycled Materials
Want to give your bike rack a unique, eco-friendly twist? I’m all about that! Consider wrapping old bike tubes around the rack’s cradles to protect your bike frame – plus, it gives it a cool, industrial vibe. You could even use reclaimed wood for the entire project! It adds character and tells a story. I once saw a rack made from old skateboards – talk about a conversation starter!
Incorporating Shelves And Hooks
Let’s get practical and stylish. Adding a shelf above or below the bike rack is a game-changer for storage. Think about it: helmet, gloves, bike lock – all in one convenient spot. And hooks? Perfect for hanging your cycling jacket, backpack, or even a small tool kit. Just make sure the shelf is super secure – you don’t want anything falling on your precious bike! I usually use end caps to keep everything in place. It’s a small detail that makes a big difference.
Showcasing Your DIY Bike Rack
Alright, you’ve put in the sweat and maybe a few splinters, and now you’ve got a sweet DIY wood bike rack. Time to show it off! Don’t hide your masterpiece away in the dark corners of your garage. Let’s get it out there for the world to see. You never know who you might inspire, or what cool ideas you might get in return. Plus, it feels good to get a little recognition for your hard work, right?
Taking Great Photos
First things first, you gotta capture your creation in all its glory. Good photos are key! Natural light is your best friend here. Try to snap some shots during the day, maybe near a window or with the garage door open. Get a few different angles – a wide shot to show the whole setup, and some close-ups to highlight the details. Make sure your bikes are clean and neatly arranged on the rack; presentation matters! Nobody wants to see a dusty bike on a crooked rack. Consider adding some props, like a helmet or some biking gear, to give it that authentic feel.
Sharing On Social Media
Okay, you’ve got the perfect photos. Now it’s time to unleash them on the world! Social media is your stage. Instagram, Facebook, even Pinterest – they’re all great places to show off your DIY skills. When you post, don’t just throw up a picture and call it a day. Write a little caption about your project. Talk about the challenges you faced, the materials you used, and what you learned along the way. Use relevant hashtags like #DIYBikeRack, #Woodworking, #GarageOrganization, and #BikeStorage to reach a wider audience. You might even inspire someone to build their own! If you used an EXPEDIT 5×5 shelf unit, mention it!
Engaging With The DIY Community
Sharing your project is just the first step. The real fun starts when you start engaging with other DIYers. Look for online forums, Facebook groups, or subreddits dedicated to woodworking or home improvement. Share your photos and ask for feedback. Offer advice to others who are working on similar projects. The DIY community is super supportive, and it’s a great place to learn new skills and make new friends. Who knows, you might even find inspiration for your next project!
Building something yourself is awesome, but sharing it with others? That’s where the real magic happens. You get to inspire people, learn from their experiences, and be part of something bigger than yourself. So don’t be shy – get out there and show off your DIY bike rack!
Maintaining Your DIY Wood Bike Storage
Alright, you’ve built your awesome DIY wood bike storage! Now, let’s keep it looking great and functioning perfectly for years to come. It’s not hard, I promise. A little bit of care goes a long way. Think of it like this: you wouldn’t just leave your bike out in the rain without a second thought, right? Same goes for its home!
Regular Inspections
Give your bike rack a quick once-over every few months. Check for any signs of wear and tear. Are there any loose screws? Any cracks in the wood? Catching these things early can prevent bigger problems down the road. It’s like a regular check-up for your bike’s home. Make sure to pay special attention to joints and areas that bear the most weight.
Cleaning Tips
Dust and grime can build up over time, especially if your bike rack is in the garage. A simple wipe-down with a damp cloth can do wonders. For tougher stains, use a mild soap and water solution. Avoid harsh chemicals, as they can damage the wood finish. Think of it as giving your bike rack a spa day – a little pampering to keep it looking its best. I usually do this when I’m cleaning my bike, so it’s all part of the same routine.
Weatherproofing Your Rack
If your bike rack is exposed to the elements, weatherproofing is essential. Apply a sealant or varnish to protect the wood from moisture and UV rays. Reapply every year or two, depending on the weather conditions in your area. This will prevent rot, warping, and fading. It’s like giving your bike rack a raincoat – keeping it dry and protected from the elements.
Taking a few minutes to maintain your DIY bike rack will not only extend its lifespan but also keep your garage or storage space looking organized and stylish. It’s a small investment of time that pays off big in the long run.
Here’s a quick checklist to keep in mind:
- Check for loose screws monthly.
- Wipe down the rack with a damp cloth every other month.
- Reapply sealant annually if outdoors.
Wrap It Up!
So there you have it! Building your own stylish DIY wood bike storage is not just a fun project, but it also helps keep your garage neat and tidy. You’ve got the tools, the materials, and now the know-how to create something that’s both functional and looks great. Plus, every time you grab your bike, you’ll feel that little spark of pride knowing you made it yourself. So, roll up those sleeves, get creative, and enjoy the satisfaction of a clutter-free space that showcases your ride!
Frequently Asked Questions
What materials do I need for a DIY bike rack?
You will need quality wood, screws, and tools like a saw and drill. Make sure to choose wood that is strong enough to hold your bike.
How can I make my bike rack look stylish?
You can paint or stain the wood to match your garage or home decor. Adding decorative elements like hooks or shelves can also enhance its look.
What if I have a small garage?
You can use vertical space by mounting your bike on the wall. Consider a folding bike rack that can be stored flat when not in use.
How do I ensure my bike rack is safe?
Make sure to securely attach the rack to the wall or floor. Regularly check for any loose screws or damage to keep it safe.
Can I use recycled materials for my bike rack?
Yes! Using recycled materials like old wood or bike parts can create a unique look and is good for the environment.
How do I maintain my DIY bike rack?
Keep your rack clean and check it regularly for any wear and tear. If it’s outside, consider weatherproofing it to protect it from the elements.