So, you’ve got a riding mower, huh? That’s great for keeping your lawn looking sharp. But where do you keep that big machine when you’re not using it? Just leaving it out in the weather isn’t a good idea. A riding mower shed is super important for keeping your mower safe and making it last longer. This article will walk you through everything you need to think about to build the perfect riding mower shed for your yard.
Key Takeaways
- Think about where your riding mower shed will go. Pick a spot that’s flat and drains well, and check if you need any permits.
- Make sure your riding mower shed is big enough for your current mower and any tools you have. Also, think about if you might get a bigger mower later.
- Choose strong materials for your riding mower shed that can handle the weather and will last a long time.
- Design your riding mower shed to be more than just storage. Make it easy to get your mower in and out, and add space for doing maintenance.
- You can choose from common riding mower shed sizes like 10×10, or you can build a custom one to fit your exact needs and space.
Finding the Perfect Spot for Your Riding Mower Shed
Okay, so you’re ready to give your riding mower a proper home. Awesome! Finding the right spot for your shed is more than just picking an empty corner of your yard. It’s about making sure your shed is functional, accessible, and doesn’t cause any headaches down the road. Let’s get into the nitty-gritty of site selection so you can start building with confidence.
Location, Location, Location: Picking the Best Site
When it comes to placing your riding mower shed, think about convenience first. You’ll want a spot that’s easy to get to with your mower, especially after a long day of yard work. Consider these points:
- Proximity to your lawn: The closer, the better! You don’t want to trek across the entire yard just to park your mower.
- Accessibility: Make sure there’s a clear path, free from obstacles like trees, fences, or flower beds. A gentle slope is preferable to a steep hill.
- Future landscaping: Think about any future plans you have for your yard. Will a new patio or garden interfere with your shed’s location?
Considering Sunlight and Drainage for Your Shed
Sunlight and water can be your shed’s worst enemies. Too much sun can fade the paint and warp the materials, while poor drainage can lead to rot and foundation problems. Here’s what to keep in mind:
- Sunlight: Ideally, you want a spot that gets some sun to help dry things out, but isn’t baking in direct sunlight all day long. Morning sun is usually better than harsh afternoon sun.
- Drainage: Avoid low-lying areas where water tends to collect. If your yard is prone to flooding, consider elevating the shed’s foundation. Proper drainage will also help with adequate ventilation inside the shed.
- Vegetation: Be mindful of trees and shrubs. Roots can damage the foundation, and falling leaves can clog gutters and cause moisture buildup.
Choosing the right location is a big deal. It’s not just about where the shed can go, but where it should go to make your life easier and your shed last longer. Take your time, walk around your yard, and really think about how you’ll use the shed in the years to come.
Navigating Permits and Local Regulations
Before you start digging, it’s important to check with your local authorities about permits and regulations. Nobody wants to get slapped with a fine or have to tear down their shed because they didn’t follow the rules. Here’s what you need to do:
- Contact your local zoning office: They can tell you about any restrictions on shed size, placement, and building codes.
- Check for setback requirements: These specify how far your shed needs to be from property lines, fences, and other structures.
- Inquire about HOA rules: If you’re part of a homeowner’s association, they may have additional guidelines you need to follow.
Sizing Up Your Riding Mower Shed Needs
Okay, so you’re ready to get serious about a shed. Awesome! But before you start hammering away or clicking ‘buy,’ let’s talk size. Getting this right is super important. Too small, and you’re crammed. Too big, and you’ve wasted space and money. Let’s find that sweet spot.
Matching Your Shed to Your Mower’s Dimensions
First things first: know your mower. I mean, really know it. Grab a tape measure and jot down the length, width, and height. Don’t just guess! Include any attachments you regularly use, like a bagger or snowplow. You’ll want to add at least a foot or two to each dimension for wiggle room. Trust me, you’ll appreciate being able to move around without banging your shins.
Planning for Future Mower Upgrades
Think ahead! Are you planning on upgrading your mower in the next few years? Maybe eyeing that zero-turn you’ve always wanted? If so, factor that into your shed size. It’s way easier to build a bigger shed now than to expand later. Consider these points:
- Research the dimensions of potential future mowers.
- Think about the types of attachments you might add.
- Account for extra space; it’s always better to have more than you need.
Making Room for All Your Lawn Care Gear
Your riding mower isn’t the only thing that needs a home. What about the fertilizer spreader? The leaf blower? The bags of grass seed? All those tools add up! Think about what else you want to store in your shed and plan accordingly. Shelving can be a lifesaver here, utilizing vertical space and keeping things organized.
Don’t forget about seasonal items! You might need space for snow removal equipment in the winter or patio furniture cushions during the off-season. A little extra space can make your shed a true multi-purpose storage solution.
Choosing the Right Materials for Your Riding Mower Shed
Okay, so you’re ready to build that shed! Awesome. Now comes the fun part: picking out the stuff it’s actually going to be made of. This isn’t just about what looks good; it’s about making sure your shed can handle whatever Mother Nature throws at it, and that your lawn equipment stays safe and sound for years to come. Let’s get into it.
Durability and Aesthetics: Finding the Balance
Alright, let’s talk looks versus toughness. You want a shed that’s going to last, but you probably don’t want it to be an eyesore. Finding that sweet spot is key. Wood is a classic choice – it looks great and can be stained or painted to match your house. But, it needs regular upkeep to prevent rot and insect damage. Metal sheds are super durable and low-maintenance, but some people find them less attractive. Vinyl is another option; it’s weather-resistant and comes in different styles, but it might not be as strong as wood or metal. Think about what matters most to you and go from there.
Weatherproofing Your Investment
Seriously, weatherproofing is a big deal. You don’t want your riding mower getting rained on, right? Here’s the deal:
- Roofing: Asphalt shingles are a common and affordable choice. Metal roofing is more expensive but lasts way longer. Wood shakes look cool but need more maintenance.
- Siding: Make sure your siding is sealed properly to keep out moisture. Overlap the siding correctly. Caulk around windows and doors.
- Foundation: A good foundation is essential to prevent water from seeping in from the ground. Gravel, concrete, or even a pre-made plastic base can work, depending on your budget and how permanent you want the shed to be.
Don’t skimp on weatherproofing. Trust me, dealing with water damage later is a huge pain. Spend a little extra now to save yourself a lot of headaches down the road.
Selecting Materials for Longevity and Style
Okay, let’s dive a bit deeper into specific materials. Here’s a quick rundown:
- Wood: Cedar and redwood are naturally rot-resistant, but they’re pricier. Pressure-treated lumber is a more affordable option, but it needs to be sealed and stained. Consider these sheds for long-term storage.
- Metal: Galvanized steel is a good choice because it resists rust. Aluminum is another option; it’s lightweight and won’t rust, but it can dent more easily.
- Vinyl: Vinyl is super low-maintenance and comes in tons of colors. It won’t rot or fade, but it can be damaged by extreme temperatures or impacts.
Here’s a simple table to help you compare:
| Material | Pros | Cons | Cost |
|---|---|---|---|
| Wood | Looks great, can be customized, relatively strong | Needs regular maintenance, susceptible to rot and insects | Moderate |
| Metal | Very durable, low-maintenance, fire-resistant | Can be less attractive, can dent | Moderate |
| Vinyl | Low-maintenance, weather-resistant, comes in many colors | Not as strong as wood or metal, can be damaged by extreme temps | Moderate |
Designing Your Riding Mower Shed for Maximum Functionality
Okay, so you’re not just throwing up four walls and a roof, right? We want a functional space here! Let’s think about how to make your riding mower shed more than just a storage box. It’s about creating a space that actually makes your lawn care easier and maybe even a little enjoyable. Let’s get into the details.
Beyond Storage: Creating a Maintenance Hub
Think of your shed as more than just a parking spot for your mower. It can be a mini-workshop! Consider adding a workbench. Even a small one can be super useful for sharpening blades, changing oil, or doing other small repairs. Good lighting is key here, too. A simple overhead light can make a huge difference, especially if you’re working in the shed during the evening. Don’t forget about ventilation! You don’t want to be breathing in fumes while you’re trying to keep your mower in tip-top shape. A small window or vent can help a lot. You might even want to think about adding a small shed hardware shop for your tools.
Smart Storage Solutions for Tools and Accessories
Let’s face it, lawn care involves more than just a mower. You’ve got trimmers, edgers, rakes, shovels, fertilizer, and a whole bunch of other stuff. Here are some ideas to keep it all organized:
- Wall-mounted racks: Perfect for hanging long-handled tools like rakes and shovels. They keep things off the floor and easy to grab.
- Shelving units: Great for storing smaller items like fertilizer bags, weed killer, and spare parts. Adjustable shelves are a plus!
- Pegboards: Ideal for organizing hand tools like screwdrivers, pliers, and wrenches. You can customize the layout to fit your needs.
Think vertically! Using wall space is a game-changer in a small shed. Maximize every inch by hanging things up. It’ll make your shed feel bigger and keep everything within easy reach.
Ensuring Easy Access and Maneuverability
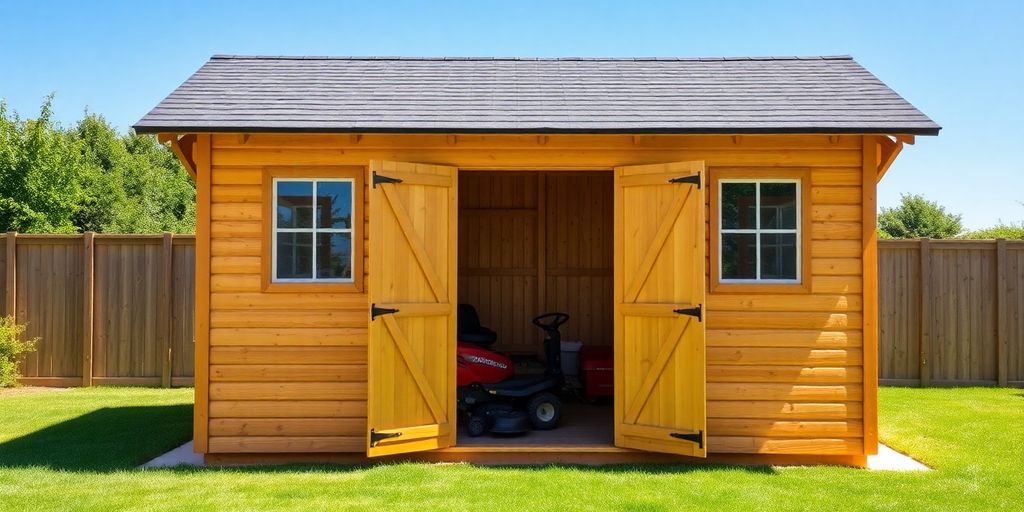
This is huge. What’s the point of having a shed if it’s a pain to get your mower in and out? Make sure the door is wide enough and tall enough for your mower, with a little extra wiggle room. A ramp is almost a must-have, especially if your shed has a raised floor. Consider the turning radius inside the shed. You don’t want to have to perform a 10-point turn every time you park your mower. Leave enough space to easily maneuver around. Also, think about the path leading to the shed. Is it smooth and level? You don’t want to be fighting with bumps and dips every time you move your mower. A well-planned path will save you a lot of headaches. Consider a 10×10 shed for easy access.
Popular Riding Mower Shed Sizes to Consider
Choosing the right size for your riding mower shed is a big deal. You want something that fits your mower, of course, but also gives you enough room to move around and store other stuff. Let’s look at some popular sizes and what they offer.
Compact Yet Capable: The 10×10 Riding Mower Shed
Okay, so a 10×10 shed might seem small, but don’t let that fool you. It’s often the perfect size for folks with smaller yards or those who don’t need a ton of extra storage. A 10×10 shed can usually fit a standard riding mower, plus some basic tools like a rake, shovel, and maybe a small bag of fertilizer. It’s all about maximizing the space you have. If you’re looking for lawnmower sheds that don’t take up your entire yard, this could be the sweet spot.
Spacious Solutions: Exploring Larger Shed Options
If you’ve got a bigger yard and more stuff to store, then a larger shed is probably the way to go. Think about a 10×12 or even a 12×16 shed. These sizes give you a ton more flexibility. You can easily fit your riding mower, a push mower, a wheelbarrow, and all sorts of other lawn care equipment. Plus, you’ll have room to actually work in the shed, maybe set up a small workbench or potting station.
Customizing Your Shed for a Perfect Fit
Sometimes, the standard sizes just don’t cut it. Maybe you have a really big riding mower, or you need a specific layout to fit your yard. That’s where customization comes in. Lots of shed builders will let you tweak the dimensions, add extra doors or windows, or even change the roof style. It might cost a bit more, but getting a shed that’s perfectly tailored to your needs is totally worth it.
Think about what you really need to store. Don’t just focus on the mower. Do you have bikes, gardening tools, or seasonal decorations that could also live in the shed? Planning ahead will help you choose the right size and avoid regretting your decision later.
Building Your Dream Riding Mower Shed
So, you’re ready to actually build this thing? Awesome! This is where all that planning turns into reality. Whether you’re a seasoned DIYer or prefer to leave it to the pros, getting your hands dirty (or watching someone else do it!) is super satisfying. Let’s break down the key steps to making your dream riding mower shed a tangible part of your lawn.
DIY or Pro: Deciding Your Building Approach
Okay, first things first: are you going to build this shed yourself, or are you hiring someone? There’s no shame in either choice! If you’re handy with tools, enjoy a good project, and have some free time, DIY can be a great way to save money and get exactly what you want. However, be realistic about your skills and time commitment. If you’re not comfortable with carpentry, electrical work, or roofing, it might be better to hire a professional. Plus, a pro can ensure the shed is built to code and will last for years to come.
Essential Steps for a Successful Shed Build
Alright, whether you’re DIYing or overseeing a contractor, here’s a general roadmap for a successful shed build:
- Foundation: A solid foundation is key. This could be a concrete slab, gravel pad, or even treated lumber skids. Make sure it’s level and well-drained.
- Framing: Build the walls and roof structure according to your plans. Use quality lumber and ensure everything is square and plumb.
- Siding and Roofing: Install the siding and roofing materials you’ve chosen. Pay close attention to weatherproofing to protect your investment.
- Doors and Windows: Install the door and any windows. Make sure the door is wide enough for your riding mower!
- Interior: Add any shelving, workbenches, or other interior features you desire.
Adding Those Finishing Touches for a Great Look
Don’t forget the details! This is where you can really personalize your shed and make it blend seamlessly with your yard. Consider these finishing touches:
- Paint or Stain: Choose a color that complements your house and landscaping.
- Landscaping: Add some plants or shrubs around the shed to soften its appearance.
- Hardware: Upgrade the door handles, hinges, and other hardware for a more polished look.
- Lighting: Install exterior lighting for safety and security.
Building a shed is a big project, but it’s totally achievable with some planning and effort. Don’t be afraid to ask for help when you need it, and most importantly, have fun with the process! You’ll have a great looking and functional space for your mower in no time.
Wrapping Things Up
So, there you have it! Building a shed for your riding mower is a pretty smart move. It keeps your machine safe from the weather, which means it’ll last longer and work better. Plus, it helps keep your yard tidy, which is always a win. Whether you go for a simple DIY project or get a pre-built one, just make sure it fits your mower and your space. You’ll be glad you did when your riding mower is happy and ready to go for years to come!
Frequently Asked Questions
Where’s the best place to put my riding mower shed?
Picking the right spot for your shed is super important. You want a flat area that drains well, so water doesn’t sit around and cause problems. Also, think about how much sun the spot gets. Too much direct sun can make the shed really hot inside, but some sun helps keep things dry.
How big should my riding mower shed be?
The size of your shed depends on your mower! Measure your riding mower’s length, width, and height first. Then, think about if you’ll get a bigger mower later or if you need space for other tools like a rake, shovel, or even a leaf blower. It’s usually better to go a little bigger than you think you need.
What kind of materials are best for a riding mower shed?
For a shed that lasts, you need strong materials. Wood is a popular choice because it looks nice and you can paint it. Metal sheds are tough and don’t need much care. Plastic sheds are light and easy to put together. Make sure whatever you pick can handle the weather where you live.
How can I make my shed more useful than just for storage?
A shed isn’t just for parking your mower. You can make it a mini-workshop! Add shelves for small tools, hooks for hanging things, and maybe even a small workbench. Make sure the door is wide enough for your mower to get in and out easily, and that there’s enough room to move around inside.
What are some common sizes for riding mower sheds?
A 10×10 shed is a good choice for many riding mowers, offering enough room for the mower and some basic tools. If you have a very large mower or lots of other equipment, you might need a bigger shed, like a 10×12 or even larger. You can also customize the inside with shelves and racks to fit your stuff perfectly.
Should I build my shed myself or hire someone?
You can build a shed yourself if you’re good with tools, but it’s a big job. If you’re not sure, hiring a pro is a good idea. Before you start, check with your local town or city to see if you need a permit. This makes sure your shed follows all the rules and is safe.