Getting around on your bike is great, but sometimes you just need to carry more stuff. Backpacks are okay, but they can get heavy and make your back sweaty. That’s where good rear bike storage comes in. It helps you bring along groceries, work gear, or even stuff for a weekend trip without feeling weighed down. This guide will show you all about making the most of your bike’s back end.
Key Takeaways
- Rear bike storage lets you carry more things easily, making your rides, whether for work or fun, much better.
- When picking a rear bike rack, think about its style, if it works with your bike’s brakes, and what it’s made of.
- Putting on your rear bike storage rack is pretty simple, but it’s good to know how to make sure it stays tight and steady.
- To get the most out of your rear bike storage, use bags like panniers and load them evenly so your ride feels balanced.
- There are smart ways to store your bike with its rear bike storage at home, like using wall mounts or stands, to save space.
Why Rear Bike Storage Is Your New Best Friend
Okay, let’s be real. You love your bike. But sometimes, you need to carry stuff, right? Backpacks get sweaty, front baskets can feel wobbly, and that’s where rear bike storage comes in to save the day. It’s like adding a trunk to your car, but way cooler and better for the environment. Seriously, once you experience the freedom of a good rear rack setup, you’ll wonder how you ever lived without it. It’s a game-changer for commutes, errands, and even those spontaneous weekend adventures. Plus, it just makes your bike look more… capable, you know?
The Freedom of Carrying More
Imagine this: You’re heading to the farmer’s market. Instead of juggling bags of produce on your handlebars, you’ve got sturdy panniers securely attached to your rear rack. No more awkward balancing acts or squished tomatoes! Rear bike storage lets you carry groceries, books, work gear, or even a picnic basket with ease. It’s all about distributing the weight evenly, so you can ride comfortably and confidently. Think of the possibilities! You can finally say yes to that extra bag of coffee beans or that heavy textbook without breaking a sweat. It’s like having a personal assistant for your bike, handling all the heavy lifting so you can enjoy the ride. And let’s not forget the sheer convenience of not having a backpack digging into your shoulders on a hot day. Trust me, your back will thank you.
Making Commutes a Breeze
Tired of showing up to work with a sweaty back and wrinkled clothes? A rear rack can transform your daily commute from a chore into a joy. Ditch the backpack and load up your work essentials – laptop, lunch, change of clothes – into panniers or a trunk bag. This not only keeps your back dry and comfortable but also distributes the weight more evenly, making for a smoother, more stable ride. Plus, you’ll arrive at your destination feeling refreshed and ready to tackle the day, instead of feeling like you just ran a marathon. And let’s be honest, looking professional is easier when you’re not sporting backpack-induced sweat stains. Consider adding some quality bike storage to your home for easy access.
Adventures Await with Extra Gear
Beyond the daily grind, rear bike storage opens up a world of adventure. Planning a weekend camping trip? A rear rack allows you to carry all your essential gear – tent, sleeping bag, cooking supplies – without sacrificing comfort or maneuverability. Imagine exploring scenic trails, discovering hidden campsites, and experiencing the great outdoors, all powered by your own two legs. No more relying on cars or public transportation to reach your favorite destinations. With a rear rack, your bike becomes your trusty steed, ready to take you on unforgettable journeys. It’s about embracing the freedom of self-supported travel and creating memories that will last a lifetime.
Think about it: a rear rack isn’t just a piece of equipment; it’s an investment in your freedom, your comfort, and your ability to explore the world on two wheels. It’s about saying yes to more adventures, more convenience, and more enjoyment on every ride.
Picking the Perfect Rear Rack for Your Ride
Alright, so you’re ready to dive into the world of rear bike racks? Awesome! It’s like adding a trunk to your car, but way cooler. Finding the right one can feel a bit overwhelming, but don’t sweat it. We’ll break it down to make sure you get a rack that fits your bike and your needs like a glove. Let’s get rolling!
Classic Styles for Every Cyclist
When it comes to rear racks, there’s a style for everyone. You’ve got your standard racks, which are super versatile and great for everyday use. These usually attach to your bike frame at the rear axle and seat stays. Then there are touring racks, built like tanks for serious weight and long distances. These are your go-to if you’re planning some epic adventures. For a sleeker look, check out the streamlined racks, often favored by road bike enthusiasts. They’re lighter and less bulky, perfect if you want to keep things looking sharp. The Ortlieb Quick Rack is a great option for simple setup.
Navigating Disc Brakes and Wheel Sizes
Okay, this is where things can get a little tricky, but don’t worry, it’s totally manageable. If your bike has disc brakes, you need to make sure the rack is compatible. Some racks are specifically designed to work with disc brakes, featuring extra clearance or adjustable mounting points. Wheel size also matters! A rack designed for a 26-inch wheel might not fit a 29er, and vice versa. Always double-check the rack’s specifications to ensure it matches your bike’s wheel size. If you’re unsure, your local bike shop can be a lifesaver.
Deciding on Rack Materials
Rack materials usually come down to aluminum or steel. Aluminum racks are lighter, which is great if you’re counting every ounce. They’re also rust-resistant, a big plus if you ride in wet conditions. Steel racks, on the other hand, are known for their strength and durability. They can handle heavier loads and are more likely to survive a crash without completely falling apart. Plus, steel is often more affordable. Consider what you’ll be carrying and how often you’ll be using the rack to make the best choice.
Choosing the right material really depends on your priorities. If weight is a concern and you don’t plan on hauling super heavy loads, aluminum is a solid choice. But if you need something that can withstand a beating and carry a ton of gear, steel is the way to go.
Installing Your Rear Rack Like a Pro
Alright, you’ve got your shiny new rear rack, and you’re itching to get it on your bike. Awesome! Don’t worry, it’s usually a pretty straightforward process. Let’s get this thing installed so you can start hauling your gear!
Simple Steps to Get It Mounted
Okay, first things first: gather your tools. You’ll probably need a set of Allen wrenches and maybe a wrench or two, depending on the rack and your bike. Now, let’s get started:
- Identify the mounting points on your bike. Most bikes have eyelets near the rear axle and on the seat stays (the bars that connect the seat tube to the rear wheel). These are where the rack will attach.
- Attach the rack’s lower supports to the eyelets near the rear axle. Use the bolts and washers that came with the rack. Don’t tighten them all the way just yet – you want a little wiggle room.
- Connect the upper supports to the eyelets on the seat stays. Again, use the provided hardware and keep things loose for now.
- Adjust the rack so it’s level and centered over the rear wheel. Once you’re happy with the position, tighten all the bolts securely. But don’t go crazy – you don’t want to strip the threads.
Troubleshooting Common Setbacks
Sometimes, things don’t go exactly as planned. Here are a few common issues and how to deal with them:
- No Eyelets? No problem! You can use P-clamps to attach the rack to your seat stays. These clamps wrap around the frame and provide a mounting point. For the lower supports, some racks can attach directly to the hub quick release or thru axle with special adapters.
- Disc Brakes in the Way? Disc brakes can sometimes interfere with rack installation. Some racks are designed specifically for bikes with disc brakes, with a bend in the supports to clear the brake caliper. If your rack isn’t disc-brake compatible, you might need to use spacers to move the rack’s supports outward.
- Bolts Too Short? If the bolts that came with the rack aren’t long enough, head to your local hardware store and pick up some longer ones. Make sure they’re the same diameter and thread pitch as the originals.
Keeping Everything Secure and Stable
Once the rack is installed, it’s important to make sure it’s secure and stable. Give it a good shake to check for any loose bolts or wobbly connections. If anything feels loose, tighten it up. Also, it’s a good idea to check the bolts periodically, especially after your first few rides. They can sometimes loosen up as the rack settles in.
A little tip: Use a dab of threadlocker (like Loctite) on the bolts to prevent them from loosening over time. Just be sure to use the blue (medium-strength) threadlocker, not the red (high-strength) stuff, unless you want to make it impossible to remove the bolts later.
And that’s it! You’ve successfully installed your rear rack. Now you’re ready to load it up and hit the road!
Maximizing What Your Rear Rack Can Carry
So, you’ve got a rear rack installed – awesome! Now, let’s talk about how to actually use it to its full potential. It’s not just about slapping anything back there; it’s about doing it smartly and safely. Let’s dive in!
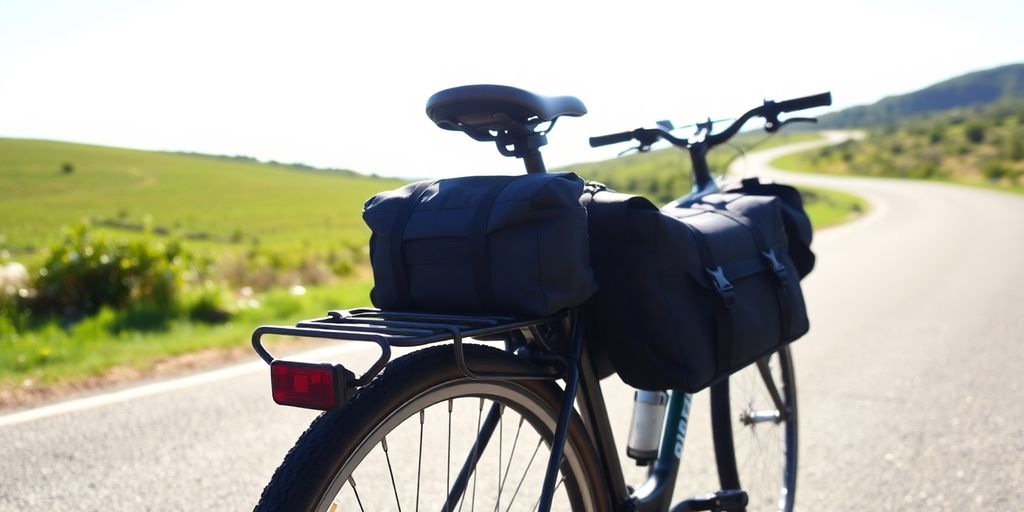
Embracing Panniers and Trunk Bags
Panniers and trunk bags are your best friends when it comes to rear rack storage. Panniers are those bags that hang on either side of your rack, distributing the weight evenly. Trunk bags sit on top of the rack, often with some extra space inside and sometimes even fold-out panniers for when you need that extra oomph. They’re way more convenient than trying to balance a backpack on your back the whole ride.
Think about what you’ll be carrying most often. If it’s groceries, look for panniers designed for that. If it’s work stuff, a trunk bag with a laptop sleeve might be the ticket. There are even waterproof options for those rainy commutes!
Smart Loading for Balanced Rides
Okay, this is important: load your rack smartly. You don’t want to end up with a wobbly, unstable ride. Here are a few tips:
- Distribute weight evenly: Try to keep the weight balanced between both sides of the rack. If you only have one pannier, put heavier items at the bottom.
- Secure everything: Make sure everything is strapped down tight. Bungee cords are your friend here, even with panniers. You don’t want anything bouncing out mid-ride.
- Keep it low: The lower the center of gravity, the more stable your bike will be. Put heavier items lower in your panniers or trunk bag.
I once tried to carry a watermelon on my rear rack without properly securing it. Let’s just say it ended with a very messy street and a very sad cyclist. Learn from my mistakes!
Ensuring Heel Clearance for Comfort
This is something a lot of people don’t think about until it’s too late: heel clearance. You need to make sure your heels aren’t hitting your panniers when you pedal. This is especially important if you have a smaller bike frame or larger feet.
Here’s how to avoid heel strike:
- Adjust your panniers: Some panniers can be adjusted forward or backward on the rack. Experiment to find the sweet spot.
- Choose smaller panniers: If you’re really struggling with clearance, consider using smaller panniers.
- Consider a rack with a longer platform: Some racks have a longer platform that pushes the panniers further back, giving you more heel clearance.
If you follow these tips, you’ll be hauling gear like a pro in no time! Happy riding!
Clever Home Solutions for Your Bike’s Rear Storage
Okay, so you’ve got your rear rack all set up, ready to haul groceries, camping gear, or whatever else you need. But what about when your bike’s not in action? Let’s talk about some smart ways to store your bike at home, keeping it safe, secure, and out of the way.
Vertical Wonders for Rear Wheel Support
Vertical bike stands are awesome, especially if you’re tight on space. They let you stand your bike upright, resting on its rear wheel, which takes up way less floor area than laying it flat. You can find simple, affordable models that just cradle the rear wheel, or fancier ones with adjustable arms to fit different tire sizes. It’s a super easy way to tuck your bike into a corner of your apartment or garage.
Wall Mounts That Cradle Your Bike’s Back
Wall mounts are another great option, and there are tons of different styles. Some grab the frame, while others support the rear wheel. The key is to find one that’s sturdy enough to hold your bike’s weight and easy to use. I’ve seen some really cool DIY versions made from wood, too, if you’re feeling crafty. Just make sure you mount it into a stud for maximum security! You can even find wall bike racks that are specifically designed for apartments.
Freestanding Stands for Easy Access
If you don’t want to drill into your walls or lift your bike too high, a freestanding stand is the way to go. These stands usually have a base that sits on the floor and arms that support the bike’s frame or rear wheel. They’re super convenient because you can just roll your bike into place without any fuss. Plus, you can easily move them around if you need to rearrange your space. They are great for house bike rack solutions.
Maintaining Your Rear Bike Storage for Years of Fun
Alright, you’ve got your rear bike storage all set up – awesome! Now, let’s make sure it stays that way for many rides to come. A little bit of care goes a long way in keeping your setup reliable and safe. Think of it as a small investment that pays off big time in worry-free cycling adventures.
Quick Checks for Lasting Durability
Before each ride, give your rack and attachments a quick once-over. Seriously, it takes like, two minutes. Make sure all the bolts are snug – not too tight, just snug. Check for any signs of wear and tear, like cracks or rust. If you spot something early, you can usually fix it before it becomes a major problem. Also, give the panniers and trunk bags a quick look to make sure they’re properly secured.
Avoiding Unnecessary Attachments
I know it’s tempting to load up your rack with everything you might possibly need, but try to resist! Extra weight puts stress on the rack and your bike’s frame. Only carry what’s essential for your ride. If you’re not using your rack, consider removing any unnecessary attachments to reduce wear and tear. Think about it – less weight means a smoother, longer-lasting ride for both you and your gear. Plus, it’s easier to handle the bike when it’s not overloaded.
DIY Fixes for Minor Wobbles
Sometimes, things get a little wobbly. It happens! Usually, it’s just a loose bolt or a slightly bent bracket. Grab your trusty multi-tool and see if you can tighten things up. If something’s bent, you might be able to gently bend it back into place with pliers. If you’re not comfortable doing it yourself, no shame in taking it to a bike shop. They can usually sort out minor issues pretty quickly and cheaply. Regular basic bike maintenance is key to avoiding bigger problems down the road.
Keeping your rear bike storage in good shape isn’t rocket science. It’s about being proactive, paying attention to the details, and addressing small issues before they become big ones. With a little bit of care, your rack will be your trusty companion for countless cycling adventures.
Your Bike, Ready for Anything!
Alright, so we’ve checked out a bunch of ways to carry your stuff on the back of your bike. It’s pretty neat, right? There’s seriously something for everyone, whether you’re just grabbing groceries or heading out for a big trip. Just pick the setup that feels good for you. Then, go enjoy those rides, knowing you can bring whatever you need along for the fun!
Frequently Asked Questions
Why is a rear bike rack a good idea for my bicycle?
A rear bike rack is super helpful because it lets you carry more stuff easily. It makes daily rides, like going to school or the store, much simpler. Plus, it means you can bring extra gear for longer bike trips or fun adventures, making your bike even more useful.
How do I pick the right rear rack for my bike?
When choosing a rear rack, first think about the basic styles. If your bike has disc brakes, you’ll need to make sure the rack fits around them; some racks are made for this, or you might need a small part called a spacer. Also, most racks are made of aluminum, which is light and strong enough for most people. Heavier steel racks exist, but they cost more and can rust.
Can I put a rear bike rack on my bike by myself?
Yes, putting on a rear bike rack is usually pretty simple. You just follow a few steps to attach it. If your bike has disc brakes, they might get in the way, but you can often fix this by using a small spacer or choosing a rack designed to clear them. Remember to check the screws every now and then to make sure they stay tight so your rack doesn’t wobble or fall off.
What’s the best way to carry things on my rear bike rack?
The best way to carry things is by using special bags called panniers that hang on the sides of the rack, or a trunk bag that sits on top. Try to put weight evenly on both sides to keep your bike balanced while riding. Also, make sure the bags don’t get in the way of your heels when you pedal, especially if your bike has a shorter frame.
Are those rear racks with spring clips worth getting?
Honestly, the spring-loaded clips you sometimes see on rear racks aren’t very useful. They don’t hold much at all, maybe just a light jacket. You’re much better off using bungee cords, which are more flexible and can hold more kinds of items, or investing in proper panniers or a trunk bag for real carrying power.
How do I take care of my rear bike rack so it lasts a long time?
It’s a good idea to regularly check the screws that attach your rack to your bike. Over time, riding can make them loosen up, and you don’t want them to fall out. Just a quick check and tightening them up when needed will keep your rack secure and ready for all your trips.